Saturday, October 26, 2013

Fall Projects

Harris pullover with pockets from Rowan Magazine #52.  This issue of Rowan Magazine has so many designs I love.  This project is the third one from it.  What I like about this pullover include pockets and single row stripes. 

However, knitting it turned out to be a challenge.  See the tangle on the photos below.  I find myself getting frustrated with the tangle after 10 rows or so.  This is going to be a slow project.  Hence, I had to come up with a simpler second project.


A lace pullover from Katia Magazine #52 is my simpler project.  I’ve had this project sitting in the bin next to my armchair for a while.  It is knitted with a cotton yarn: i.e. a summer project.  Nevertheless, it will be my simpler project. 

Instructions on Katia Magazines are a bit different from others: each row is charted as you face them.  Stockinet stitches are charted with blank cells for odd rows (knit) and with dashed cells for even rows (purl), while garter stitches are charted with blank cells on both odd and even rows.  In Japanese knitting books, stockinet and garter stitches are charted in completely opposite manner (all cells blank for stockinet).  Once you realize that, it is okay.  But not always.  For this particular design, Katia's charting method does not seem to work well.  I had to replace k2tog done on reverse row to p2tog or p2tog tbl.  I could discern these errors by inspecting the photograph.  I am knitting a sleeve first.


I learned a new cast on technique in this Katia project.  See the photo above.  The main lace stitches are knitted with 4.5 mm or 5.5 mm needles, while cast on stitches were done with 6.5 mm and with three strands of yarns held together.  I used 7 mm needles as I do not have 6.5 mm ones.  With this method, you can plunge into the lace pattern from row 1 and there is no curling. 

An extra project in preparation for #37 from Vogue Crochet Magazine from 2012, involving broomstick stitches.  Since I was not certain about how to do broomstick lace, I bought Doris Chan's Crochet Lace Innovations.  I love this book for three reasons: broomstick lace instructions and designs, hairpin lace instructions, and her foundation single crochet stitches.   I am working on Soolin belt from her book.  The bottom photo shows the foundation single crochet stitch.  It is much nicer and stable than chain stitches. 


That’s all.


Monday, October 21, 2013

Tunisian Crochet Lace Tunic

It is finally finished and I just love it.  Jojoland Melody is a light and beautiful yarn, and turned out to be just perfect for this tunic.  What a luck!  Can you tell how happy I am with the tunic?  I like the length of the bodice as well as the sleeves. 


 I deviated from the pattern and did the following:
Sleeves: Cast on 78 stitches (must be a multiple of 3) for 16 ½” long sleeves. Sleeves were knit sideway. The Tss and Tps edge was about 1” long. To knit 15” wide sleeves, 28 rows in pattern stitches were needed. On the 28th row, do Tss on return, and follow with 3 rows of Tps for the edging.  I left the remaining yarn on each sleeve, to be used later in assembly.  I used one ball per sleeve.
Front and Back Bodice: Cast on 117 stitches and knit 40 rows in pattern (19 ½”), reducing to 99 stitches over the 40 rows (reduce 3 stitches at each end every 10 rows starting at row 11, three times total, 18 stitches decreased). Place a marker at each side at 40th row for the sleeve placement. Knit 16 more rows (7 ½”). On the last row, do Tss on return followed by three rows of Tps for the edging.
Assembly: Seam bodice together with right sides together from the bottom edge to the marker. Seam bodice and sleeves together with right sides together, making sure the attached yarn of the sleeves will be at the cuff end. With the attached yarn on the sleeves, knit top edge finishing as instructed. With the same yarn, knit the sleeve cuff edging. Instead of buttons, I used chain stitches in zigzag pattern to close the top of the sleeves and shoulders.  I borrowed this method from Madonna pullover I knit this summer. 


More photos of close up and the on-the-table flat photos.


This was my first successful crochet project.  I think I will do more crochet in the future.


Sunday, October 06, 2013

Striped tank top

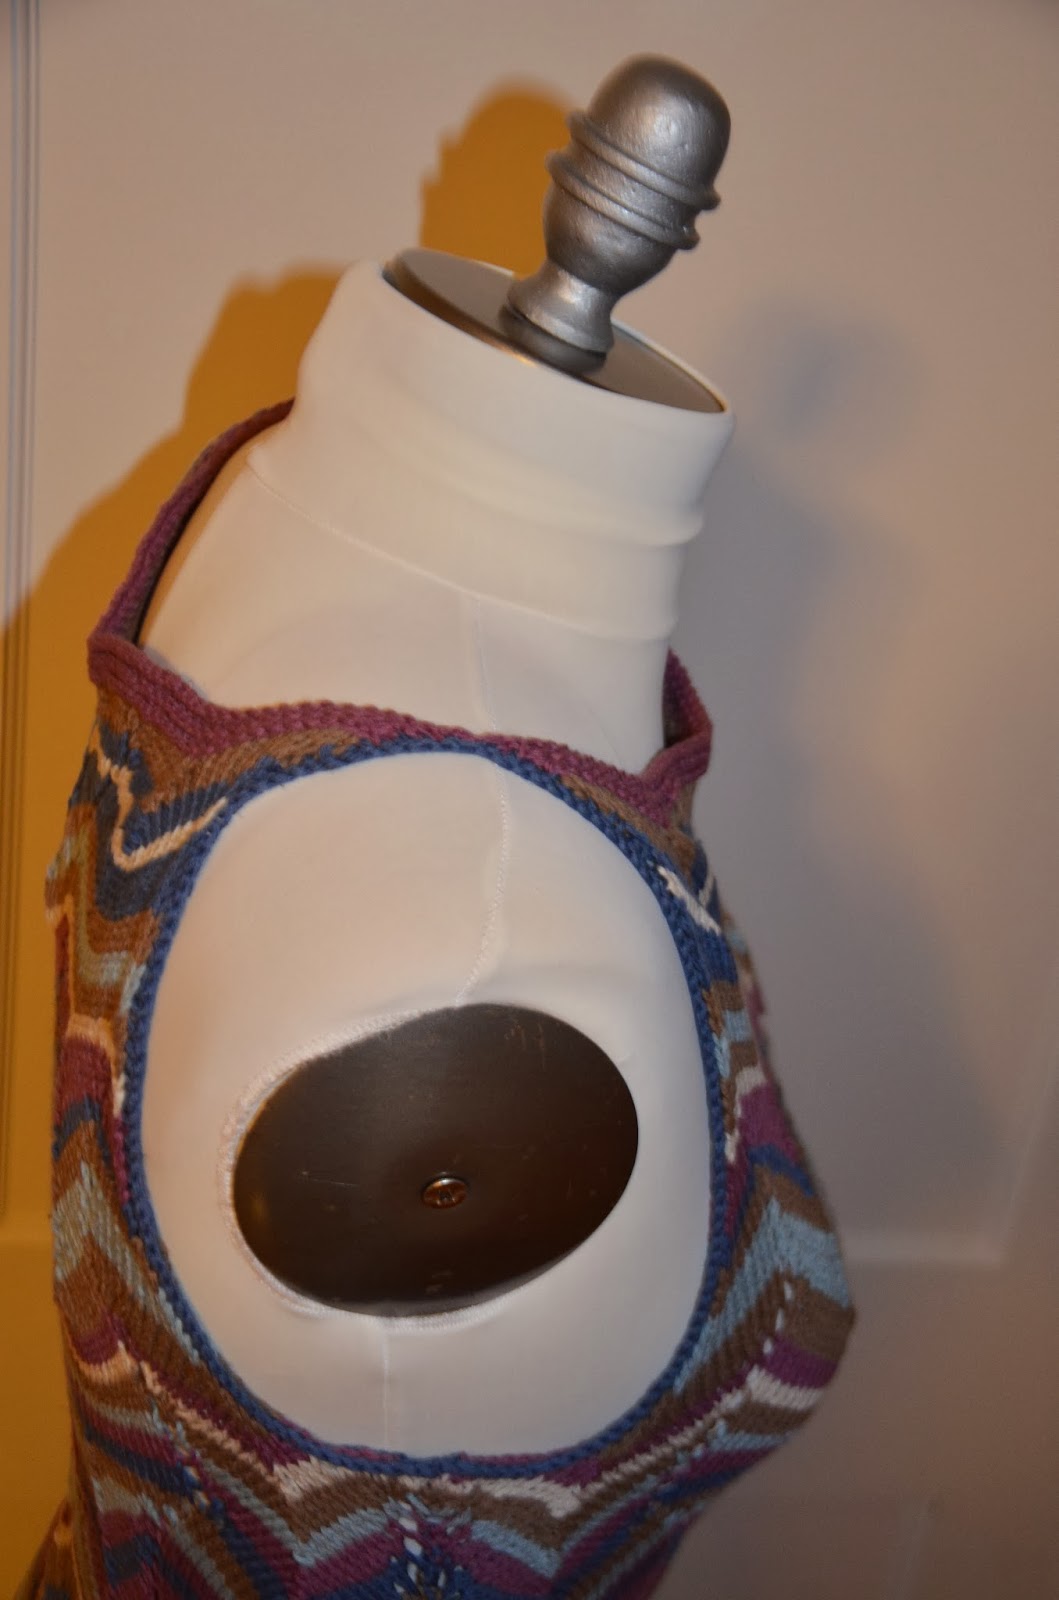
My extreme striped tank top was finished last week.   It is already washed and dried and on my dress form. 


I like skinny shoulder seams.

Armhole shaping worked rather well.


Here is what I did to knit the tank top.
Front and Back a like: 
  • Cast on 107 stitches with Azure and knit 4 rows in garter stitches.  Switch to Imperial Purple and start the zigzag pattern.  When 4” completed from the hem, start side shaping at Row 33 of zigzag pattern: i.e. the fifth row at (A on the color sequence table): decrease one stitch at each end every 8 rows for four times, and increase one stitch at each end every 8 rows for four times.  Continue through Row 102 (Parchment).  Remember to switch zigzag pattern every 18 rows.
  • Armhole Shaping: On the first row at (B), start armhole shaping as follows.  Cast off 7 stitches at the beginning of Row 103 and 104.  Starting with Row 105, decrease 1 stitch at each end of every right side row for 14 times total (65 stitches remain).
  • Continue with the zigzag pattern through Row 150.  With Imperial Purple, knit in garter stitch for five rows, and cast off knit-wise loosely.  Cut off the yarn leaving about 8".
The front and the back pieces were connected by armhole edging only: pick up stitches along the front and then continue to pick up stitches from the back armhole in Azure (make sure to pick up stitches tightly) and cast off knit-wise.  I picked up seven cast off stitches and one stitch per row on the vertical section.  Using the yarn end in Imperial Purple, sew together the end stitches on the last row on the front and the last row on the back.  Clean up the yarn ends (which was a lot of work).

In all, I used about 200 grams or 600 yards of Allegoro yarns.  I love the result very much and would like to knit a dress version next summer.

Friday, September 27, 2013

Hats for Veterans 2013

This year I have four hats for Veterans knitted up.  I used two free patterns from Ravelry: Urchin by Ysolda Teague and Tick Tock Toque by Knot Canadian.  Both of them were fun to knit. 


Urchin hats were knitted with Brown Sheep's Lamb's Pride Bulky in Clematis and Lang Yarns' Malou.  Both yarns are soft but Malou is so nice against skin.  I hope whoever gets it will enjoy wearing it.  Tick Tock Toque hats were knitted with leftover Rowan Colourscape yarns.  I was pleasantly surprised that I had enough leftovers for two hats.  I call them cup cake hats.  The top part looks like icing, doesn't it? 


Monday, September 23, 2013

Louisa Harding Booklet 126

Phil was finished last Sunday.  It is from Louisa Harding Booklet #126. 


As I wrote earlier, I love many designs from this booklet besides Phil: Bertie in red/purple stripes and Jamie in green.  I am planning to knit these two garments next spring.

Changes made in Phil:
  • Sleeves: Casting on 57 stitches for the lace edge pattern was okay (2 rows in Confiture and the rest in Noir), but it was way too wide for a sleeve: 32 cm wide.  So, on the second row in the striped section (in Confiture), stitches were reduced by 15 to 42 by: (k2, ssk) five times, (k1, ssk) six times, (k2, ssk) four times, and k3.  Also, I changed the striped pattern a little: 2 rows Confiture, 1 row Berries, (4 rows Noir, 1 row Berries, 2 rows Confiture, 1 row Berries), and repeat (..).  When Berries was used for the first time, I started knitting at the left edge facing the wrong side.  This was done so that the rest of the color changes occur on the right edge of the sleeve.  At the same time, increase at each end of the sleeve by 1 stitch every 5 rows starting at row 8 (first one in Berries).  Knit 59 rows total in the stripe pattern, ending with Berries.
  • Back and front: The stripe pattern was changed just like for sleeves: 2 rows Confiture, 1 row Berries, (4 rows Noir, 1 row Berries, 2 rows Confiture, 1 row Berries), and repeat (..).  On row 18 in Confiture, do eyelet pattern.  Knit total of 67 rows, ending with Berries.
  • Yoke: Initially I knitted the yoke in round.  I did not like the area where yarns were changed.  It looked very sloppy.  So, I ripped all the yoke, added two extra stitches for seams, and knitted back and forth.  I did 44 rows in the specified pattern instead of 40 rows.  On the last four rows, I reduced extra 8 stitches, ending with 110 stitches (plus two edge stitches).

I think the person who prepared the samples for the magazine photos knitted them rather loosely.  My yarnovers did not produce large holes like you see in the photo.   That contributed to my needs to add more rows. 

Sunday, September 15, 2013

Phil by Louisa Harding

When we drove to Western Mass to pick up our DDs from their camp in August, we stopped by at WEBS and I picked up a couple of booklets by Louisa Harding.  In them, there are striped Summer/Spring garments featuring Colline and Mila yarns.  I am a nut with stripes, you may have noticed.  I particularly liked Phil and saw it in red and black in my mind.  It so turned out Colline comes in black as well as bright colors.  That was it.  I had to knit it with Noir and Confiture.  Now the third color to be placed between black and red.  My initial thought was as white as possible: i.e. Lily which is very pale pink.  It did not work out.  In the end I chose Berries among green, orange, pale pink and the chosen wine. 


The entire garment is knitted with reverse stockinette stitches with some lace pattern at the lower edges.  I am done with the sleeves (top two pieces).  The Left sleeve shows the right side, while the right one is with the reverse side up.  The instruction had me knit sleeves without any side shaping and the lower edges looked a bit too wide on the slender model.  So, I reduced the stitch count right after the lace edging.  Oh, I chose to do the version with elbow length sleeves and made them a bit longer.  I must confess I love many of the garments on this booklet. 

Unlike some of my typical projects with no concern for practicality, this pullover will be worn with a black bottom which I have several.  

Update on my extreme stripe project.  I did cast on and knitted some 30 rows.  So far, so good.  I think I need to add side shaping.  TBC.


Monday, September 09, 2013

Denim Dawn

I had six balls of Rowan Denim and thought I had enough to make Dawn.   I was right, but could well have been wrong.   When sewing was done, I had about 8” of yarn left. Phew! Taking Denim’s shrinkage into account, I lengthened the bodice by 8 rows in the front, and only 4 rows in the back.  The back turned out shorter because I ran out of the yarn to make it as long as the front.   This difference did not matter much, however. The cardigan before washing had some blousing as you can see in the photos below.

I was a bit worried about a possible disaster, but I went ahead and washed the garment in hot water and machine dried.


Can you see how much it has shrunken and all the blousing is gone?   The cardigan looks more like the yellow version with Fable.  Faded color is really lovely as well. It is unfortunate I discover my love for this yarn this late. Why did I not try Rowan Denim before it got discontinued?


Also, I found a way to wear the Madonna pullover. After so much work got into this pullover, I had to find a way. 


Saturday, September 07, 2013

Extreme Stripes

Ravelry is a fantastic source of inspiration for me.  Among many knitters on it, Julia's work is truly spectacular and she posted a gorgeous sleeveless top with Missoni-like colors and knit pattern.  I am so inspired by her.  She used Aria by Lana Grossa which is a light weight DK or sports weight as it has more than 180 yards per 50g ball and has a tape construction.  Her color choice was motivated by Tenerife Island's flowers, cacti, and soil.  Just a gorgeous top she designed.  If you are on Ravelry, you can follow this link to see what I mean.

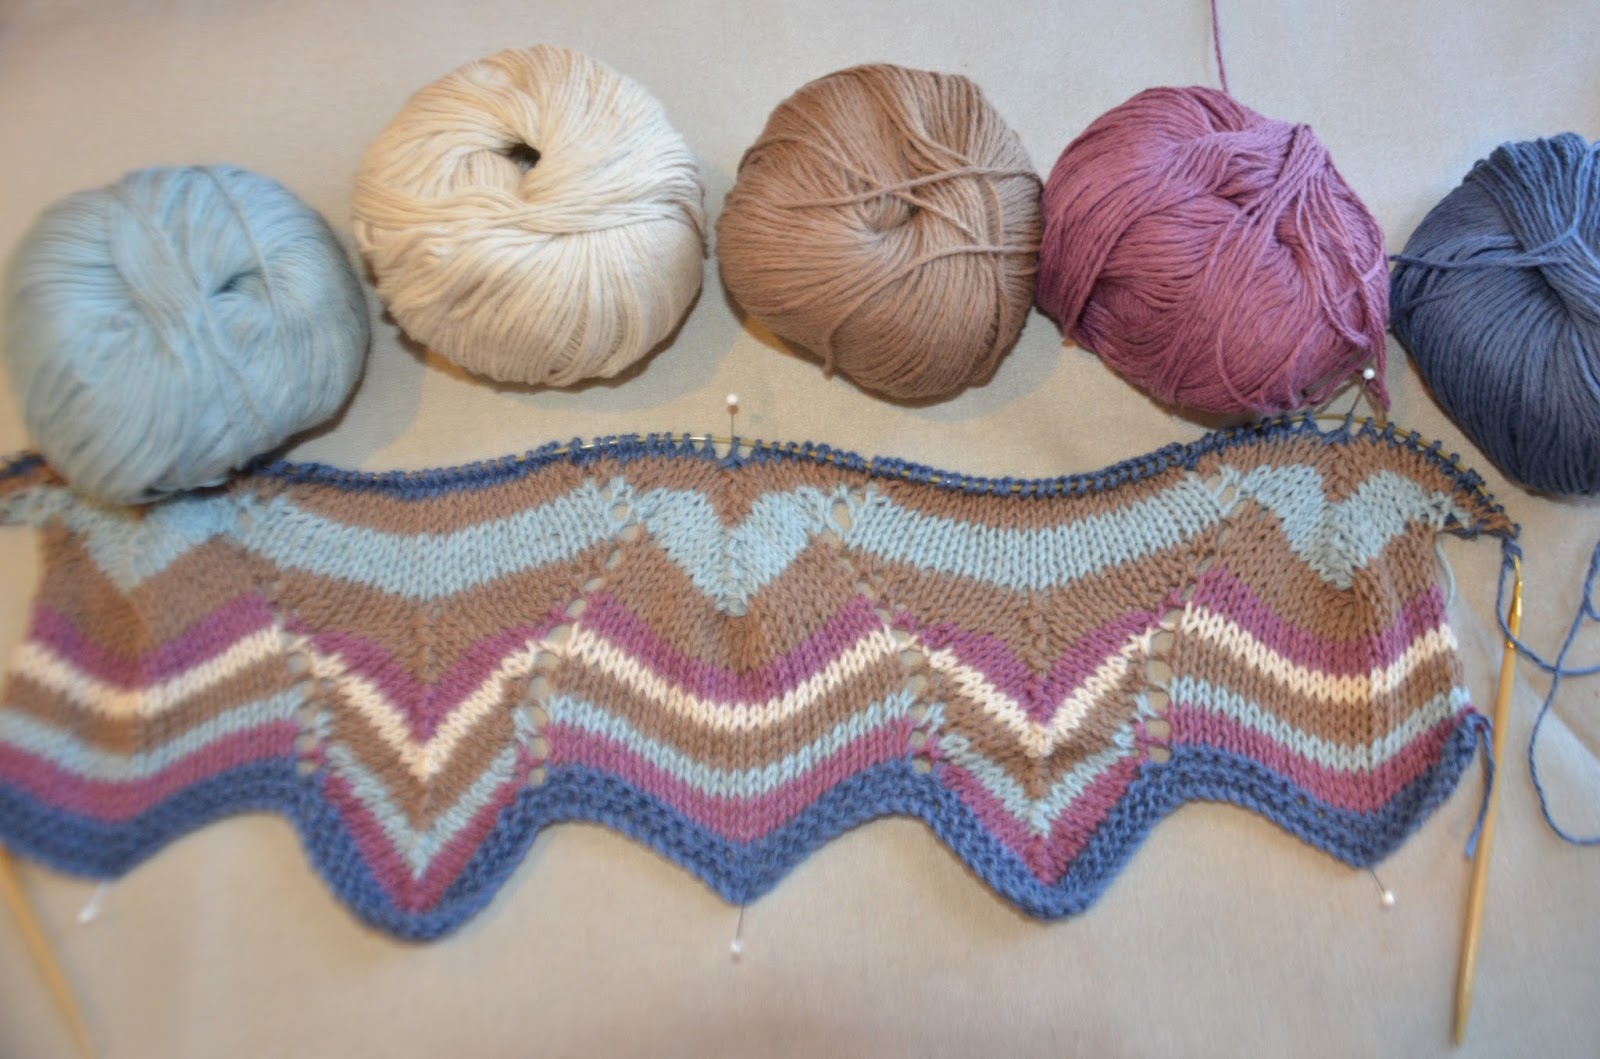
I am going to use CEY’s Verde Collection Allegoro in five colors, two balls each: Imperial Purple (red), Raw Umber (orange/brown), Skydiver (light blue), Parchment (ivory), and Azure (dark blue).  With the stripe pattern below and 2 ½ pattern repeats per front or back (105+2 stitches each), I will get 35” circumference, which is perfect!

Extreme Zigzag Pattern: 42-stitch by 36 row repeats:

Row 1: k21, *yo, k9, knit 3 tog with center back, right on top (slip1 as if to knit, k2tog, slip the slipped stitch over k2tog), k9, yo, k21 *, repeat from * to *.
Row 2: p21, ** p2, p1 into the bar before the next stitch, p7, purl 3 tog with center front, left at back (p2tog, rearrange the next stitch so that the right leg is in the back, slip it over the p2tog), p7, p1 into the bar before the next stitch, p2, p21 **, repeat from ** to **.
Repeat Row 1 and Row 2 eight more times with total of 18 rows.
Row 19: *yo, k9, knit 3 tog with center back, right on top (slip1 as if to knit, k2tog, slip the slipped stitch over k2tog), k9, yo, k21 *, repeat from * to *.
Row 20: ** p2, p1 into the bar before the next stitch, p7, purl 3 tog with center front, left at back (p2tog, rearrange the next stitch so that the right leg is in the back, slip it over the p2tog), p7, p1 into the bar before the next stitch, p2, p21**, repeat from ** to **.
Repeat Row 19 and Row 20 eight more times with total of 36 rows completed.


Color sequence and row numbers (total of 92 rows) are shown below.  At least this is my plan. 


I cannot wait to cast on for a swatch!


Wednesday, September 04, 2013

Short Summer Jacket

My knitting and sewing activities are often driven by either yarns or patterns, but not by needs.  So, more often than not, my creations sit in my closet for a long time.  Is it bad?  As long as I enjoy the process of making garments, it is okay, right?  I picked Madonna pullover because I was intrigued by the yarns.  Nidden was motivated by its gorgeous lace pattern and the drapey yarns I had, plus a wish to have a comfortable summer cover-up garment.

 Usually, I go through a few stressful days when I do not have a next project in mind.  This time, however, I already had Dawn, already swatched and all.  I sort of wished to have a small cardigan, but I do not have a particular need for it.  As a matter of fact, I have no garments I would wear it with.  See my ill conceived creative efforts?  For sure, my finished Dawn will languish in my closet for who knows how long.   No matter.  I just go forward. 

 So, I purchased this cotton/silk blend worsted weight yarns long time ago in various colors enough to knit children’s garments.  Well, before I had time to get to the yarns, my DDs had grown and they do not like the colors any longer.  Their names are cute: Three Little Pigs, Red Little Riding Hood, etc.  This summer, I finally decided that DDs are not going to want anything out of these yarns.  They shall be mine.  Then it was rather easy to find appropriate patterns for the yellow Three Little Pigs: Dawn by Kim Hargreaves.  The reason why I had such hard time coming up with right patterns for my DDs was that I simply do not know their taste well enough and I was striking out all the time.  Well, I know myself better than them.

Dawn took me about two weeks to complete.  I found perfect buttons as well.  Here it is.


See how perfect those buttons are?  Also notice that the fabric is not as drapey as seen by other knitters on Ravelry?  This is because Fable is heavy worsted weight, I think.

Did I tell you I love Dawn?  It is fun to knit and goes fast.  As a matter of fact, I have already started another Dawn.  This time, I am using Rowan Denim.  I think I have enough to make another one knit a bit longer to counter the shrinkage of Denim yarns.  This version is turning out to be very lacey.  The same pattern used on different yarns could turn out quite differently. 


Monday, September 02, 2013

No Vacation This Summer

Usually at the end of August, we visit our relatives abroad.  My parents are in their 80’s and I want visit them as often as I could.  Unfortunately, we cannot have any vacation this summer.  It is because I had a long sick leave this year in March.  I was home-bound for more than four weeks after a vitrectomy on my left eye and was forced to face down 24 hours a day.  The macular hole was mended by the surgery, but I still have a hole in my vision, although it is getting smaller very slowly. 

At the same time, I began suffering from frozen shoulder on my right side in February.  It was very bad in March especially when I had to sleep facing down or on my right side.  The latter was just impossible and I would wake up many times a night with severe shoulder pains.  It got worse in April before it began to settle down.  At the same time, my left shoulder began to act up.  I am much better now thanks to acupuncture and moxibustion.   

With all these health issues I’ve had this year so far, I need a vacation badly.  Yet, I do not have any more vacation days left.  Sigh.

Fortunately, it has been nice around here this summer and I can enjoy my garden in August:
Japanese Anemone (anemone tomentosa robustissima);


Chartreuse green sedum from my friend (Angelina stonecrop?) ;


And, lespedeza.  It is called Hagi in Japanese.


Sunday, August 25, 2013

Summer Projects Update

Since my last post, I completed Nidden after much struggles, and a support structure was added to Madonna pullover. 

Changes made to Madonna pullover:  I did backward single crochet to finish the neck edge, a much simpler edging than the original. Also, I added more stitches along the neck edge than instructed.  I do not like a close fitted neckline for warm weather garments.  A supportive structure was added.  With it, the neckline felt more comfortable and the garment is now wearable.

What I wish I had done to Madonna pullover:  I wish I did some garter rows at the bottom edge.  I do not like curling in this garment.  I ended up applying a Petersham band to the bottom edge to control the curling.  The photo below shows both the support and the Petersham band applied.


It is a tricky garment as Madonna is a bit too dressy for my everyday needs.  As a matter of fact, I am not sure what to wear with it.  My daughters insisted only jeans would go with it.   

Nidden was a lot of work because I knitted the back twice and the left front three times.  Other than that, it turned out really nice.  There are so many changes made in my version because of the differences in gauge and the yarn quantity limitation.  It will be too much to list them out. 
  • The top of the back bodice was kept straight after 4" was completed above the armhole shaping.

  • One of the major changes I made was to reduce the original 61-stitch lace pattern to 45-stitch pattern, and then to 43 stitches: Two stitches at 1-by-1 rib at each side, four stitches on each wavy pattern, and four stitches at the center motif, with the total of 16 stitches reduced.  I also replaced k 2p k with k p k between the wavy pattern and the side rib pattern to reduce two more stitches from 45 to 43.  By changing the stitch count, the motif height is also reduced from 28 rows to 20 rows.  I was able to keep the similar look of the original lace pattern.  The back lace section is on the left side on the photo, much wider than that on the front shown on the right.

  • Another change was the sleeve head.  I placed the assembled bodice onto my dress form and slipped a sleeve of my Gomashio cardigan which was knitted with the same yarn some time ago.  The sleeve fitted Nidden well and I decided to use Gomashio sleeve pattern instead:10” cuff width, 16” underarm length, and 5 1/2” sleeve head height. For the cuff, I did 56 rows of the pattern stitches which got stretched to 10”. Picked up 45 stitches from the cuff and knit 94 rows before sleeve head shaping began. The width of the sleeve was increased every 20 rows four times, 53 stitches total. Cast off 4 stitches at each end to begin sleeve head shaping, Row 95, with 45 stitches remaining. Every two rows, one stitch decreased at each end for 11 times total, and every 4 rows four times, leaving 15 stitches on the needles. Cast off 15 stitches. 


Overall, I am satisfied with Nidden and I love its back.  So pretty. 


Sunday, July 21, 2013

Summer Knitting

So far, my summer knitting has involved a lot of trial and error and struggling.

I challenged myself and picked up a new technique, Tunisian crochet. I was not that interested in simple Tunisian crochet, but I fell for gorgeous lace patterns. I am not working on it as much lately since the yarn I am using for the project is wool and I have issues working on wool in summer, especially during last week when the temperature hit 99F/37C!

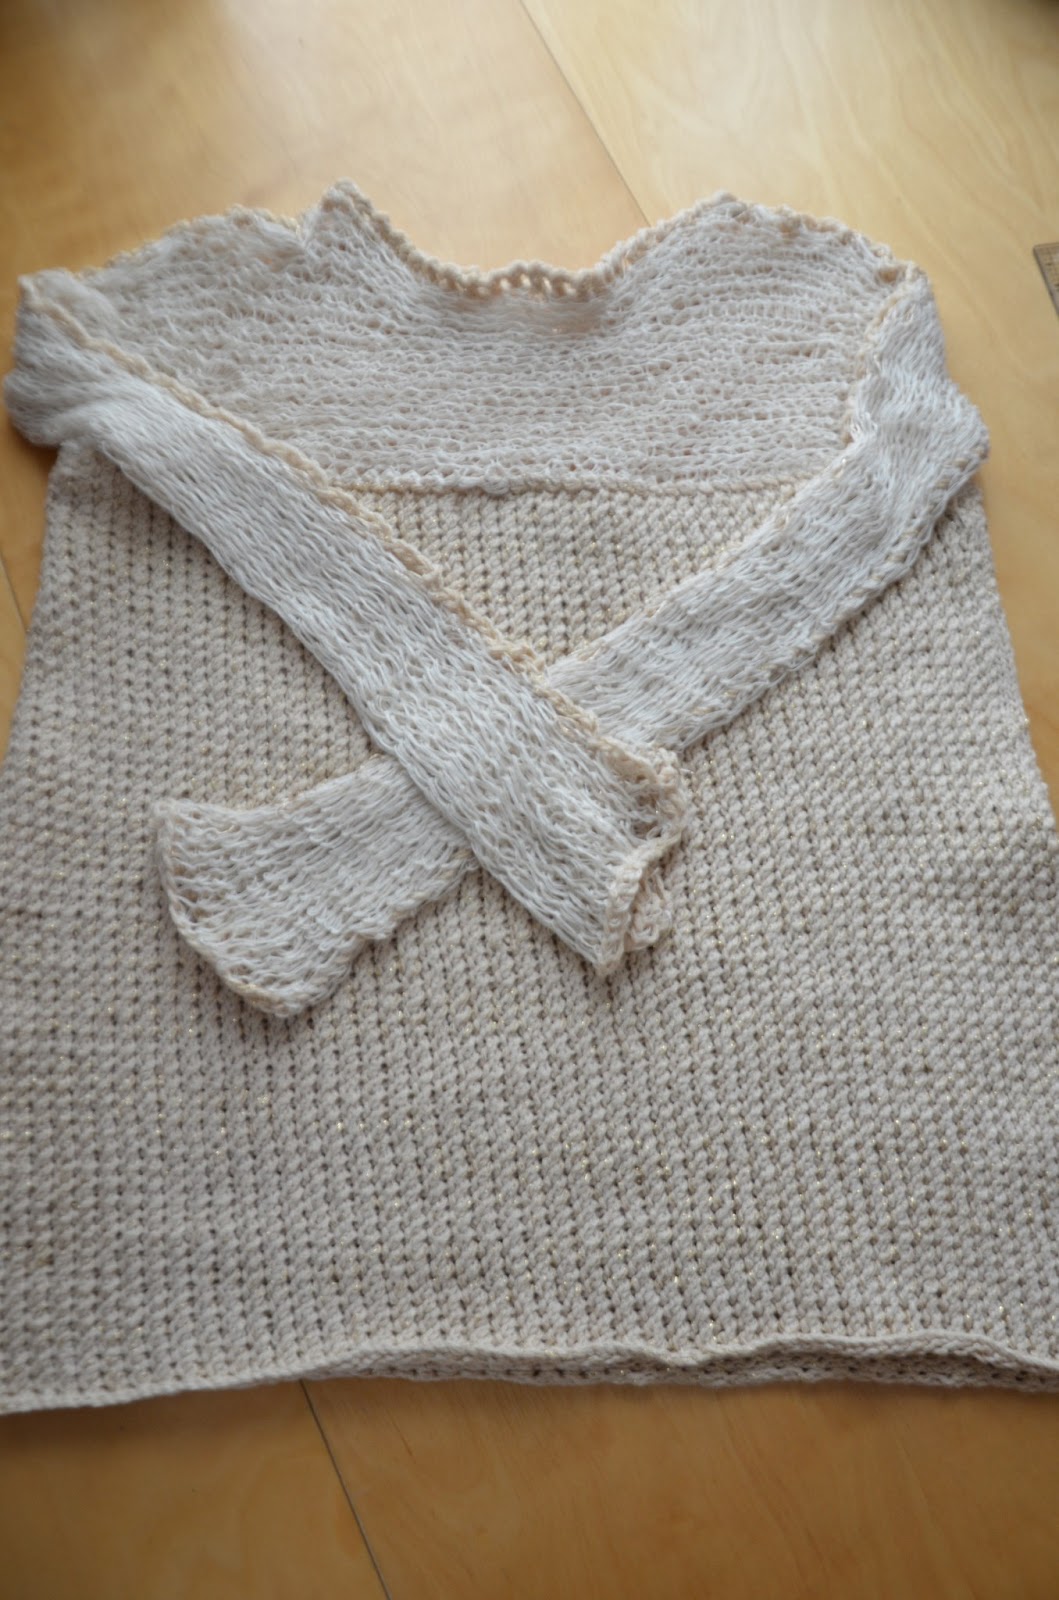
So, I began an ivory pullover from last year’s Stacy Charles summer booklet. I finished knitting and assembling but I am not done with it. Why? The top bodice is constructed by two long pieces of pre-knitted tape, Celeste. I don’t think I did such a good job dealing with ends. I can live with the mess, however. What I cannot live with is the fact that the top edge of the lower bodice crosses my chest in a very awkward place. This is caused by the lower bodice being rather dense and heavy due to the stitch pattern and the pre-knitted tape is stretched too much above it. Fortunately, I have a piece of skin-colored knit fabric at hand. I am planning to sew a truncated tank top sort of thing to support the heavy lower bodice. We shall see.

Here are photos of the pullover.  The front and the back are exactly the same.  I know, I know, they should not be the same but among the knitting designs, it is quite common to see this symmetry between them.  I think we knitters tend to trust in the stretchy fabric to take care of differences between the front and the back, and I think it is okay to do so up to a point. 


The next challenge is to knit Nidden from Norah Gaughan booklet no. 8 with 13 skeins of now discontinued Berroco Denim Silk. First off, gauge is not right. I've knitted a cardigan with Denim Silk before using 4.5 mm needles and I love the resulting drapey fabric. I tried 3.75 mm needles per pattern instruction and did not like the stiff fabric. Besides, in my crude calculation, I do not have enough skeins. So, I went up to 4.5 mm needles.

Nidden is constructed in such a way that front pieces with the lace pattern continue beyond shoulders and meet at the center back. The design uses the stretchy nature of the knitted fabric to overcome curved and rounded shape at the shoulders and along the neckline. The gorgeous lace pattern takes up 61 stitches. Given that my gauge is 18 stitches per 4”, it means I will have 13.5” of upper back covered by the continuous front pieces while it ought to be about 10.5” for my size. Besides, I will run out of my yarns. The only way out is to reduce the width of the lace pattern although the lace design will be noticeably altered. I need to think about how to modify the lace design.

In the mean time, I started knitting the back piece. With the help of my manikin, I should be able to figure out how I ought to modify the front pieces.


You see, my summer knitting is nothing but easy.

Sunday, June 30, 2013

Tunisian Crochet Project

I have been working on a lovely tunic from last year's Vogue Crochet magazine, #32 . This project is one of several Tunisian crochet projects in the magazine I liked and especially I like #37 besides #32. By the way, this is my first time taking up Tunisian crochet. So, how have I been doing?  Well, so far so good, although with a lot of trial and error. For example, I am currently working on my third sleeve and I will need to make a fourth one: i.e. my first two were not good at all.

First of all, the yarn used.  I have had seven balls of Jojoland Melody, a light fingering weight yarn, in navy blue/burgundy mix for several years.  I thought they were perfect for the tunic. The original design was crocheted with Koigu KPPPM using 5 mm hook.  Melody is thinner and less meaty than Koigu and I decided to start with 4 mm hook.

Before taking a plunge, I did some practice with 4 mm hook and obtained the gauge of 21 stitches and 10 rows for 4” by 4” square. I thought I was ready.  Since I was not certain about the yarn amount, I did some crude calculation and concluded that I had to be able to complete one sleeve with a ball of Melody.

As usual, I started with a sleeve when not certain about the gauge or the design. With my gauge, 16.5” meant 87 stitches. I think the pattern instruction has the cast on numbers for sleeves wrong. It should be 78 stitches with the gauge and the intended length. When I was almost done with the first ball of yarn, I had still some inches to complete one sleeve. Not good at all! I had to make the garment smaller (not a good idea), or go up on the hook size to make the fabric less dense. I took the latter option and restarted with 5 mm hook.  Assuming I was not too far off from the gauge in the instructions, I started with 78 stitches. 


When I completed the second sleeve I noticed that the fabric was too stretchy at the lower half than the upper half (see the photo above).  Also, I noticed a severe biasing of the fabric towards right. Apparently, this biasing is typical for Tunisian crochet. I was not happy with the completed sleeve at all. Looks like I was still learning how to maintain the tension with the first half of the sleeve. What do I do? I contemplated for a few days and decided to start again. I hate to regret too late. So, here I am, working on the first good sleeve. I am crossing my fingers!


Sunday, June 16, 2013

Lovely Orkney Cardigan, Part 2

Now a shocking discovery to report. I made a major error in knitting the bodice of Orkney: I forgot to make button holes. I was drawn to Orkney for its clean front edge without button bands, yet I forgot to knit button holes! I realized this error when I was decreasing stitches at shoulders. Too late, I said. I need to figure out how I could force button holes.

I recalled reading about button holes can be made after completing by manipulating yarns around a stitch. That’s what I decided to do. I was worried that ‘manipulation’ and ‘coaxing’ of yarn might cause too much wear and tear. In order to provide some support, I decided to use petershams for facings instead of knitted ones.

Here is what I did. I used 1” wide petersham tape for the left front, and two stripes of ½” wide tapes, sewn together except for button holes, for the right front. After the petershams were applied, I gently forced button holes on the knitted bodice. Ah, when I was applying the petershams, I realized that my steeks was too wide since the button hole had to be made through steeks as well. This was to be avoided. So, I had to re-work crochet anchoring and cut off excess.

The photo below shows the left front facing sewn on, and the right facing being assembled.


The right facing sewn on the right edge with button inserted in the button holes. 


And, here is it.  Finally done!  All the buttons are sewn and corresponding holes are made.


One more note on the project. The color Mineral was used in sleeves only. I have a lot of it leftover. The yarn amount was all sufficient even though I added steeks. The least amount left was in Billberry.


It is too warm to wear Orkney now.  Must wait for some cooler days to come back.