Sunday, October 03, 2010

Three hats for Veterans


In the town I live, there is a group of ladies who organized Brookline Keeps Smiling and I decided to join in to help out a little. I knitted these hats with my leftover yarns in Aran and worsted weight and using a free pattern from Drops Design.

The original hat is designed for their super bulky yarn with 7 stitches per 4” gauge and I made adjustment for the yarns I used. I used 5.5 mm and 7 mm needles for all versions.

Beige version: Aran weight smooth wool with Aran weight mohair yarns, about 150 yards each.

Pattern: Cast on 68 stitches with both yarns held together and with 5.5 mm needles. Purl one row. The edge stitches are done with garter stitches throughout. Knit with one-by-one ribbing for 10 rows. Switch to Brioche stitches and with 7 mm needles and knit for 36 rows. On row 37 reduce 11 columns evenly, and on row 41 reduce 7 columns evenly. On row 45, k3tog, 10 stitches remain. Pull stitches together and sew the side seam.

Purple/Grey version: Tahki Donegal Tweed in purple and Brown Sheep Lamb’s Pride Worsted in grey.

Pattern: Cast on 68 stitches with both yarns held together and with 5.5 mm needles. Purl one row. The edge stitches are done with garter stitches throughout. Knit with one-by-one ribbing for 6 rows. Switch to Brioche stitches and follow the same instructions as above.

Red/Black version: Tahki Donegal Tweeds in red and black. I had considerably less red yarns and had to make this hat smaller than the previous two.

Pattern: Cast on 68 stitches with both yarns held together and with 5.5 mm needles. Purl one row. The edge stitches are done with garter stitches throughout. Knit with one-by-one ribbing for 6 rows. Switch to Brioche stitches and with 7 mm needles and knit for 32 rows. On row 33 reduce 11 columns evenly, and on row 39 reduce 11 columns evenly. On row 43, do k3tog. Pull the remaining stitches together and sew the side seam.


My DDs modeled them for me. Thanks girls!

Sunday, September 12, 2010

Donna Karan 1159 and rant

Another Vogue pattern dress by Donna Karan. I used a very drapey viscose knit print from my stash.

I read in PatternReview.com that some notches do not match. So, I went carefully examining instructions and drawings both. Also, many complained that the armholes are too deep. So I revised armhole lines as shown below in red, and applied stay tapes along the armholes.


My fix worked fine as shown on my dress form. However, I could have done better by making the following changes in both back and front armholes so that the bottom of the armholes do not sit towards front bodice.
Now, I must document what I observed on instruction sheet below. There are several instructions and drawings which are not correct.
Step 18: Another blogger mentioned it as well. To sew the lining and the dress piece together, one must place the right side of lining and wrong side of the back body section together. Otherwise, the wrong side of the lining will be against your legs.
In step 21, the drawing shows that the pleated front skirt section is sewn on to the right side of the lining. Well, it should be the wrong side.
There is an error on step 3, but you do not notice it until almost at the end, step 26. Step 3 have you fold over one of the edges along the shoulder line. Judging from the pattern sheet and the drawing, I folded the shoulder side.

In step 25, notches were not matching. No big deal, I thought. After all, step 23 confirmed what I did in step 3 was correct.

Then, in step 26 what do I see?

The folded edge on Step 3 should have been the neck side. This made sense to me. As you wear the dress, the front has a nice folded edge and it looks smoother when the neck edge is folded over at shoulder as well. Now this can be easily fixed by undoing Step 3 and fold the neck edges over. Well, not quite. When you do so, the pleats along the shoulder seam are now displaced: they are not centered as they should be. In order to correct it, one must start with the pattern piece and move all the marking for pleats about 1cm towards the center of the pattern piece, fold the pattern sheet along the new pleat lines and re-draw the upper edges accordingly.
Although I am quite happy with the dress and the misplaced pleats are not that bothersome, I’ll have to tackle this pattern again.

Sunday, September 05, 2010

Harmonie Stripes

This cardigan is a modified version of Harmonie from Rowan’s The Milk Cotton Collection. Its fabric is knit with two-row stripes with slip stitches. Slipped stitches produces considerably thicker fabric. The row gauge here was 50 per 4 inches. My thought was that this fabric would not suitable for a pullover but great for a jacket or cardigan. I also had a large leftover stash of cotton and cotton blends in DK weight.


The only new yarns I had to get were in lilac pink for front and collar bands and stone for the finished version. In between, I tried with other color schemes which included dark green and plum. They did not look right among my other pale colors. So, they were out.

When I try a new stitch pattern, I usually start with a sleeve to test and it was knitted per pattern instruction. For bodice parts, I wanted to add more side shaping and length, which was accomplished by measuring my favorite tee shirt and calculating row and stitch counts. Once that is done, the back was knitted. With the back bodice on the dress form, I decided how deep I want the front neck line to go down. More calculation was followed. I made the front wider by the width of the front band.

I am quite pleased with the result.

Thursday, August 26, 2010

Habu Textiles

This was my first visit at Habu Textiles.  Thanks to my friend Mari who took me around in NYC, I could cover five yarn stores in one day.  Thank you very much Mari.  My highlight of the day was definitely Habu.  I had prepared myself for the visit with Setsuko Torii's book weeks before: what to knit and what to get.  But the shop offers so many yarns which are completely unknown to me that I was not sure at all what to do with them.  Seeing garment samples were definitely helpful.  In the end I decided to go with my original idea of purchasing yarns for Ms. Torii's colorful cardigan.  It is knitted with cashmere yarns but I decided to go with merino yarns.  I chose six colors per instructions by Habu staff, and they assembled my kit.  Since the merino yarn was much thinner than cashmere yarn, each ball was composed of four strands: two each in two colors or four strands in single color.  One ball in dark green was done with two strand only and it is for front and neck band.  I requested for 10% extra yarns.

Habu Kit with Extra Fine Merino yarns in six colors

The above photo shows colors A through O in four strands and color a in two strands.  My colors were red, orange, chartreuse green, light brown, beige and dark green. 

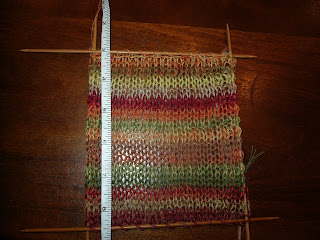
Now to swatching.  Using 5.5 mm needles per instruction, I cast on 25 stitches and knittted two rows each in all the colors: A throug O.  Looks really loose, too loose, actually.  I've never done such loose knitting before and was really nerveous. 


Before felting

After felting 


After felting, though, the fabric fluffed up quite alot and you cannot see the table's surface through stitches, though it is rather loose compared to other hand knitting I've done.  I've never careated such a fabric before.  It is definitely new.  Do I like it?  I think I do.  The garment will be very light weight and soft. 

My row gauge after felting was almost at target, but my stitch gauge was a bit off.  To make sure that the garment does not turn out too large, I will be using 5 mm needles. 

Thursday, April 01, 2010

Jiutepec from Cornelia Tuttle Hamilton's "Noro Eternal"

As soon as “Noro Eternal” came out, I fell in love with Jiutepec for its design and yarns: Noro Iro and Silk Garden. In case you did not know, I just adore Noro yarns. Of course, it helps that the model is showing off the garment so stylishly. In any case, Jiutepec's knitting process caught my eyes. Ms. Hamilton's previous books also included a design with holes and I wanted to try them on a garment. Also interesting is that the garment is knitted with size 7 mm needles throughout even though Iro is very bulky and Silk Garden is worsted weight. I had yarns in my stash for more than two years before I started the project this year. Thinking back, I did not jump into this project immediately because I was unsure about the success of the garment. For one thing, I was not quite sure which cast on method I should employ for holes. Once decided that simple loop cast on will do, I felt more comfortable and started the project. I wanted my cast on edges to be soft and not bulky.

This garment is knit side-way: Starting at right front band, and proceed to right front body, back body, left front body, and left front band. I was happily knitting along until I hit left front neck shaping. It did not look the same as the right neck shaping. I think the right front neck shaping is not correct and that's what you knit at the beginning. There is no way I would undo all the way to the beginning. I wish I had checked the pattern before I casted on. When the right neck shaping is followed, I would have a very odd neck opening with back neck width of hardly 2". My neck is not that skinny. If you follow the left neck shaping, it would be about 4" which is more reasonable. Since I did not want to undo all the knitting, I compromised to use the right neck shaping. In order to produce enough back neck width, front shoulders were eased somewhat when sewn onto the back shoulders. This fudging seems to have worked.

There is one more issue to this pattern on the ribbed edges. When they tell you to repeat two rows 6 more times, one of the two repeated rows involve increasing two stitches every 5 stitches. If followed as instructed, the ribbed edging will become quite voluminous which is not what you see on the garment photos. Obviously, the referred row is not the one to repeat. I proceeded to do k4-p3 ribbing for 12 more rows.

The amount of yarns used for the smallest size were the following: 2.5 skeins of Noro Iro in Reds,2 skeins of Noro Iro in Grey/Browns, 3 skeins of Noro Silk Garden in Grey/Browns.


I love the jacket and my friends do, too. I don’t mind knitting up another one in different colors!

Thursday, March 04, 2010

Vogue 1087 and Angelina Vintage Jacket

I needed something to wear to a company party last December. I have piles of gorgeous fabrics and patterns, and I hate shopping for dresses since it takes too much time. It also takes a lot of time to sew one myself. You are saying I knit a lot. Why not sew instead of knit? Well, I can knit in the living room with my family, but I cannot sew there. I can cut pattern pieces there, but that’s just about it. Another problem is that I am completely out of practice in matching fabrics to patterns. Yes, it takes time to do this matching, at least for me. Having a lot of each does not help, either. I almost gave up in the idea of a brand new dress for the occasion. I did some fixing in preparation and have a nice wearable pullover. It might be okay for the occasion? Maybe. If only I had time to contemplate, … .

Then I remembered.  I’ve been in love with Vogue 1087 since it came out. I knew there were some issues with the pattern thanks to bloggers I ‘met’ at Sewing Pattern Review. I had two yards of beautiful burned out velvet in black/raspberry/mauve/burgundy colors. Slowly, I started the project. Some of the drawings on the instruction sheet did not make sense. No matter. It must have been an error. I’ve been knitting long enough to trust my gut feeling. Pictures and drawings can be flipped by mistake and cause confusions if the garment is not symmetric. I knew that. Well, I did okay in the end.


Now, to complete the outfit, I borrowed my daughter's cashmere cardigan for the occasion.  But I knew I could knit something really nice if I had time.  It is Angelina Vintage Jacket by Joan McGowan-Michael.  I've had the charcoal gray Peruvian Quechua from Elann.com for this project for a long time. The yarn feels really soft, light and warm due to its blend of alpaca and tencel.  Although it involves quite a lot of 2-by-2 rib which I do not like very much, it went rather fast.  I followed the pattern mostly except for smoothing out increases and decreases for sleeves and shortening sleeve edges.

Saturday, February 20, 2010

Colourscape Folk Collection

After knitting the last pullover with Rowan Colourscape, I discovered "Colourscape Folk Collection." It has at least three garments I'd love to knit: Bobbie, Drew, and Polly. Drew was just what I was looking for, although I like it to be a bit longer. I love its subtler variation of colorway Misty: not as spectacular as the VK pullover and actually quite tame, yet, eye-catching. Likewise, brown/reds/rust in Autumn colorway is nice. I've been thinking that I need to knit what I can wear to my office. You see, my boss does not approve jeans at any time and I suspect he likes us to wear business suit type clothes. I thought Drew is just the right mix of playfulness and seriousness.

Another issue for my work clothes is that it cannot be too warm. My office tends to heat up too warm and long sleeve cardigans and pullovers I've knitted are not quite useful in the office. Something like Drew or Bobbie, a cap-sleeved cardigan, are just right.

Now, Polly. I am attracted to this pullover for both colors and the design although it may not be office appropriate. I love those deep colors of Ghost colorway.

To start with I knitted Drew with some changes.


I made it wider at the bottom edge and longer with more side shaping. Instead of just stretching the garter edging, short rows were added where front neck shaping starts and at back shoulders. Instead of making two button holes, only one was made to accommodate a beautiful metal button I found. After a few wearing, I thought I could have added more side shaping, but that will be for another time, if at all.


Saturday, February 13, 2010

VK Colourscape Pullover by KF

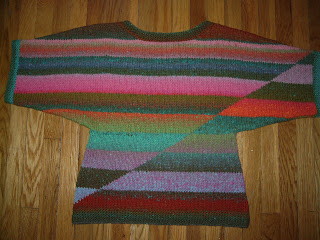
As soon as I opened the new VK magazine, I noticed a pullover by KF. I love stripes to begin with. KF's dolman sleeve pullover has a diagonal twist to it. And, the colors! I began obsessing over the design. The only thing prevented me from jump right into the project was the dimension of the garment: bodice was too short and sleeves were too long for me. As always, I started tinkering with the design dimensions.
Based on a Rowan pullover with huge kimono sleeves I knitted a few years ago, I decided on the dimensions and did some calculation to determine stitch and row counts. I must say I was lucky this time and my numbers all worked out.

Saturday, January 09, 2010

Silk Vintage Dress


Something I made back in 2005 with Vintage Vogue 2401 pattern using red and black cross-woven silk dupioni.


With collar up.


Vintage Vogue 2401 is a reproduction from 1952.  I have serveral of Vintage Vogue, but this one was the first re-production I tried.  I love its vintage style with a modern flair.  One thing I did not expect is that there is no zipper on this dress. How do you put it on? The skirt has two sections with each section attached to front or back bodice. The sides of the back bodice extend forward and tied in front, while the sides of the front bodice have belting pieces attached with hook or eye. As a consequence, one might experience embarrassing moments when a wind blows your skirt pieces apart.


So as not to be concerned about this potential mishap, a piece of seam binding tape was attached to connect the front skirt edge and the corresponding side seam of the back skirt on the right. On the left, the same tape was attached to the left side seam of the back skirt, but snapped on to the left front skirt edge.


Front skirt with seam tapes sewn at sides.


Left side

I'd love to make another one from this pattern with one modification: add a zipper in the back to allow easier dressing, one of those inserted in the middle center back, a few inches below the collar.  As is, it is quite a struggle to put it on and off.  Of course, loosing some pounds would be a great help. 


Dava asked about the shoes I am wearing.  Here is a close up of them.  They are dark red patent leather high heels with silver buckles by Aerosol from several years back.  Perfect for the vintage dress. 

Saturday, January 02, 2010

Happy New Year!


Here is something I finished last year after a long hibernation.

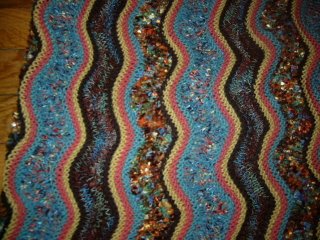
I love the colors and the wavy stitch pattern in stripes: waves, stripes and vivid colors are my weakness.

The idea came to me in early 2004 and by the summer of the same year, I had the sweater knitted up, took some photos, then … , the garment was packed away. I was meaning to save the project which turned out to be too large on me. I meant to do so for five years. Until last November, in an attempt to bring myself back to sewing, I decided that I do this fixing first. I undid almost all the seams except those on shoulders. Instead of cutting off the knitted fabric, I opted to sew with a wider seam allowances as this is a very soft and light fabric.

Love the bell-shaped sleeves.


Why didn’t I fix this thing earlier? I did not know this actually, but it was to have something lovely for the New Year!


Sheila asked about the yarn I used. They are the following in the order of knitting from the bottom hem:
1 - DS(Douceur et Soie) 19 (dark purplish red),
2 - KH(Kidsilk Haze) 600 (dewberry, mauve),
3 - Kids Seta (light blue),
4 - DS 2 (ivory),
5 - DS 20 (blue),
6 - KH 604 (light brown),
7 - KH 595 (dark red),
8 - KH 603 (white), and
9 - Kids Seta (chocolate brown).
Yarns were doubled through out.