Monday, May 26, 2014

New Project and New Bag

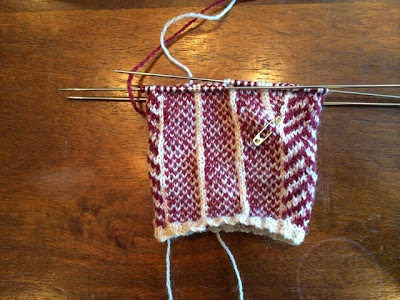
I was not planning to start another pair of gloves so soon, but I got excited about the pattern and I cast on almost immediately.


See my new project bag?  It is made by Alexis, a fellow Knitsmith.  It is just perfect for my new addiction which is Glove Knitting.


I am using the leftover Legacy Lace from Duke Design Sanquar gloves.  Since I have less in Pinot Noir, I reversed the color scheme.  The original pattern is written for fingering weight while mine is a lace weight.  I am revising the pattern to accommodate the gauge difference as I go along.  So far, I've used 0000 and 000 needles.  


Saturday, May 24, 2014

Finished Gloves

My first gloves are completed.


As I inspect each glove, it is clear the first one, the left glove, suffered multiple unknitting and knitting as well as unevenness of tension.  In comparison, the right glove went much smoother.

The right glove on my hand.


I am encouraged with the experience and planning to knit more gloves.  The next one in my list is Herringbone Gloves.

Saturday, May 17, 2014

Taming Uneven Stitches in Round

As reported in the last post, it was my fourth start that was successful and it went well until I began knitting fingers.  Those small tiny circumferences are tricky.  I ended up knitting too tight or too loose, requiring unknitting and knitting here and there.  I may have knitted 10 fingers or more to get them right.  I need to check my knitting regularly it seems.  

I also noticed, depending on the thickness of the yarns which is not consistent, my stitch size varied.  What can I say.  I would love to find a wool/silk blend lace weight yarns for the next pair of gloves.  Any suggestions?  


With Lisa’s advice, I decided to place the little finger a bit lower than the other three fingers.  I slipped stitches for the little finger onto safety pin 7 rounds before starting the other fingers (on the fifth round of the fifth pattern repeat): Knit 11 stitches and transfer them to a safety pin, continue knitting 68 stitches, and transfer the remaining 9 stitches to a safety pin.  To complete the round, cast on 9 stitches for a gusset and join.

The rest of the glove was knitted per instruction, except the number of rows in checkerboard pattern at the tip of the middle finger: I knit 1 row only instead of 3.

Notes:
  1. At the start of each finger, two dark colored stitches are picked up at the beginning of the round.  Pick them up and knit by inserting a needle into stitches.  When inserted between stitches, a hole was visible.
  2. Hold the right needles below the needle with stitches just finished.  It is easier to control tension when held in this manner.
  3. On last two rows at finger tips:

    • Distribute stitches so that all three needles have the same stitch count and the stitch pattern:  BWBWBWBWBWB. 
    • Next round: ssk in B, ssk in W, k2tog in B, W, ssk in B, k2tog in B: Choose ssk and k2tog so that the stitch on top has different color from the stitch to be knitted.  
    • Last round: ssk in B, ssk in W, k2tog in B. 


Saturday, May 10, 2014

Sanquhar Gloves by SWRI Dumfries Museum


This is what I am knitting.  Its geometric pattern is so pretty.  

My pattern came from Scottish Women's Rural Institute some years ago.  They have four variations available: Midge & Fly, Duke (the one I am going to knit), Shepherds Plaids, and Prince of Wales.  The pattern can be purchased at SWRI (here).  If you are interested in more information you could read on at Dumfries Museum.


After swatching and getting used to 1.5 mm needles, I began casting on for the left glove.   It was not a smooth sailing.   After the fourth trial in knitting the actual glove, I finally got the satisfactory result!  As they say, practice makes it perfect.  

Here is what I did which is a bit different form the last post and I used stockinet stitches only on lighter color.  I cast on 81 stitches in 1-by-1 ribbed cable cast-on method.  The first stitch was purled in the rib pattern.  Do not join.  Knit the next solid color row flat in the rib pattern until one stitch remain.  Join by purling the last and the first stitch together.   The ends of the first row will be sewn together later.


  • R1: Knit in the rib pattern in dark color. 
  • R2: Start Fair Isle.  Rib in dark color while stockinet in lighter color. 
  • R3-5: As in R2. 
  • R6: Knit all the stitches in stockinet this round onward.


The cast-on edge is slightly curled, but it does not have the thickness observed on the second swatch.  So, I am happy with it.  

Wednesday, May 07, 2014

Taming Curled Cast-On Edge

I did another swatch ...

As you can see, the first one on the right is curled up at the cast on edge when not pinned down.  My second swatch (on the left) is not! 


I used a cast on method with one-by-one cable pattern described here.  The rest of the instruction is written as if to knit in round while the swatch was knit flat.
  • Knit the first round in solid dark color in the rib pattern. 
  • Knit the next Fair Isle round in the rib pattern using Elizabeth’s purl-when-you-can method (the stitches in lighter color in stockinet).
  • Knit the next two Fair Isle rounds in the rib pattern.
  • On the next round, knit stitches in lighter color in stockinet and those in darker color in the rib pattern. 
  • On the next round onward, knit all the stitches in stockinet.
The second one is better than the first in terms of curling, but it is a bit uneven and actually look a bit thicker at the bottom.  It is because of the ribbing on Fair Isle rows.  When I used the rib pattern over a few rounds only, the edge was still curling.  Thus, I continued in the rib pattern for four rounds. 

I am ready to cast on for real! 

Monday, May 05, 2014

Next Projects

Over the last weekend, I finished Bailey’s Irish Cream by Thea Colman.  What I like about this cardigan are: the front bands where she uses rolled edges very effectively; the lace pattern which is not over-the-top; and raglan sleeves.  I used luscious cashmere blend Lana Gatto VIP in beige tone.  I hope it does not pill too much.  This is such a cute cardigan and I may knit another one.  If I were to use a yarn with similar weight, i.e. sport weight, I would widen the sleeves or knit one size up in 42”, and knit the bottom facing with smaller needles.   

So what is on my needles now?  None at the moment, but I am having two projects swatched: Gemini pullover from Knitty 2012 with a wool/linen blend, Lienen Los from Schoppel-Wolle; and Duke Sanquhar gloves by Scottish Women’s Rural Institute. 

The yarn for Gemini was purchased from Gather Here in Cambridge where a store sample of Gemini with the same yarn was displayed.  I will make the sleeves longer. 

Duke gloves have been on my to-knit list for ever.  I purchased the pattern years ago through KBTH.  When the latest issue of Knitting Traditions (Spring 2014) featured Sanquhar gloves, I shared the magazine with my Knitsmith members.  One of the members, Lisa, who has knitted several gorgeous gloves in the past, asked me if I want to knit a pair with her.  Of course, I agreed.  Her experience in glove knitting will be very helpful to me.  As some of you may be wondering why someone who struggle with small circumferences would knit gloves, it will be a challenge for me for sure.  With such small needles, 000 or 0000 (they are 1.5 mm or 1.25 mm), and thin yarns on gauge 12 stitches per inch, I am hoping the result would be somehow different and my stitches will not be as wonky as in larger needles.  We shall see.  I am currently swatching in order to get used to the needles and the stitch tension.


Since the cast-on edge is curling, I am still tinkering with swatches....