Monday, September 02, 2013

No Vacation This Summer

Usually at the end of August, we visit our relatives abroad.  My parents are in their 80’s and I want visit them as often as I could.  Unfortunately, we cannot have any vacation this summer.  It is because I had a long sick leave this year in March.  I was home-bound for more than four weeks after a vitrectomy on my left eye and was forced to face down 24 hours a day.  The macular hole was mended by the surgery, but I still have a hole in my vision, although it is getting smaller very slowly. 

At the same time, I began suffering from frozen shoulder on my right side in February.  It was very bad in March especially when I had to sleep facing down or on my right side.  The latter was just impossible and I would wake up many times a night with severe shoulder pains.  It got worse in April before it began to settle down.  At the same time, my left shoulder began to act up.  I am much better now thanks to acupuncture and moxibustion.   

With all these health issues I’ve had this year so far, I need a vacation badly.  Yet, I do not have any more vacation days left.  Sigh.

Fortunately, it has been nice around here this summer and I can enjoy my garden in August:
Japanese Anemone (anemone tomentosa robustissima);


Chartreuse green sedum from my friend (Angelina stonecrop?) ;


And, lespedeza.  It is called Hagi in Japanese.


Sunday, August 25, 2013

Summer Projects Update

Since my last post, I completed Nidden after much struggles, and a support structure was added to Madonna pullover. 

Changes made to Madonna pullover:  I did backward single crochet to finish the neck edge, a much simpler edging than the original. Also, I added more stitches along the neck edge than instructed.  I do not like a close fitted neckline for warm weather garments.  A supportive structure was added.  With it, the neckline felt more comfortable and the garment is now wearable.

What I wish I had done to Madonna pullover:  I wish I did some garter rows at the bottom edge.  I do not like curling in this garment.  I ended up applying a Petersham band to the bottom edge to control the curling.  The photo below shows both the support and the Petersham band applied.


It is a tricky garment as Madonna is a bit too dressy for my everyday needs.  As a matter of fact, I am not sure what to wear with it.  My daughters insisted only jeans would go with it.   

Nidden was a lot of work because I knitted the back twice and the left front three times.  Other than that, it turned out really nice.  There are so many changes made in my version because of the differences in gauge and the yarn quantity limitation.  It will be too much to list them out. 
  • The top of the back bodice was kept straight after 4" was completed above the armhole shaping.

  • One of the major changes I made was to reduce the original 61-stitch lace pattern to 45-stitch pattern, and then to 43 stitches: Two stitches at 1-by-1 rib at each side, four stitches on each wavy pattern, and four stitches at the center motif, with the total of 16 stitches reduced.  I also replaced k 2p k with k p k between the wavy pattern and the side rib pattern to reduce two more stitches from 45 to 43.  By changing the stitch count, the motif height is also reduced from 28 rows to 20 rows.  I was able to keep the similar look of the original lace pattern.  The back lace section is on the left side on the photo, much wider than that on the front shown on the right.

  • Another change was the sleeve head.  I placed the assembled bodice onto my dress form and slipped a sleeve of my Gomashio cardigan which was knitted with the same yarn some time ago.  The sleeve fitted Nidden well and I decided to use Gomashio sleeve pattern instead:10” cuff width, 16” underarm length, and 5 1/2” sleeve head height. For the cuff, I did 56 rows of the pattern stitches which got stretched to 10”. Picked up 45 stitches from the cuff and knit 94 rows before sleeve head shaping began. The width of the sleeve was increased every 20 rows four times, 53 stitches total. Cast off 4 stitches at each end to begin sleeve head shaping, Row 95, with 45 stitches remaining. Every two rows, one stitch decreased at each end for 11 times total, and every 4 rows four times, leaving 15 stitches on the needles. Cast off 15 stitches. 


Overall, I am satisfied with Nidden and I love its back.  So pretty. 


Sunday, July 21, 2013

Summer Knitting

So far, my summer knitting has involved a lot of trial and error and struggling.

I challenged myself and picked up a new technique, Tunisian crochet. I was not that interested in simple Tunisian crochet, but I fell for gorgeous lace patterns. I am not working on it as much lately since the yarn I am using for the project is wool and I have issues working on wool in summer, especially during last week when the temperature hit 99F/37C!

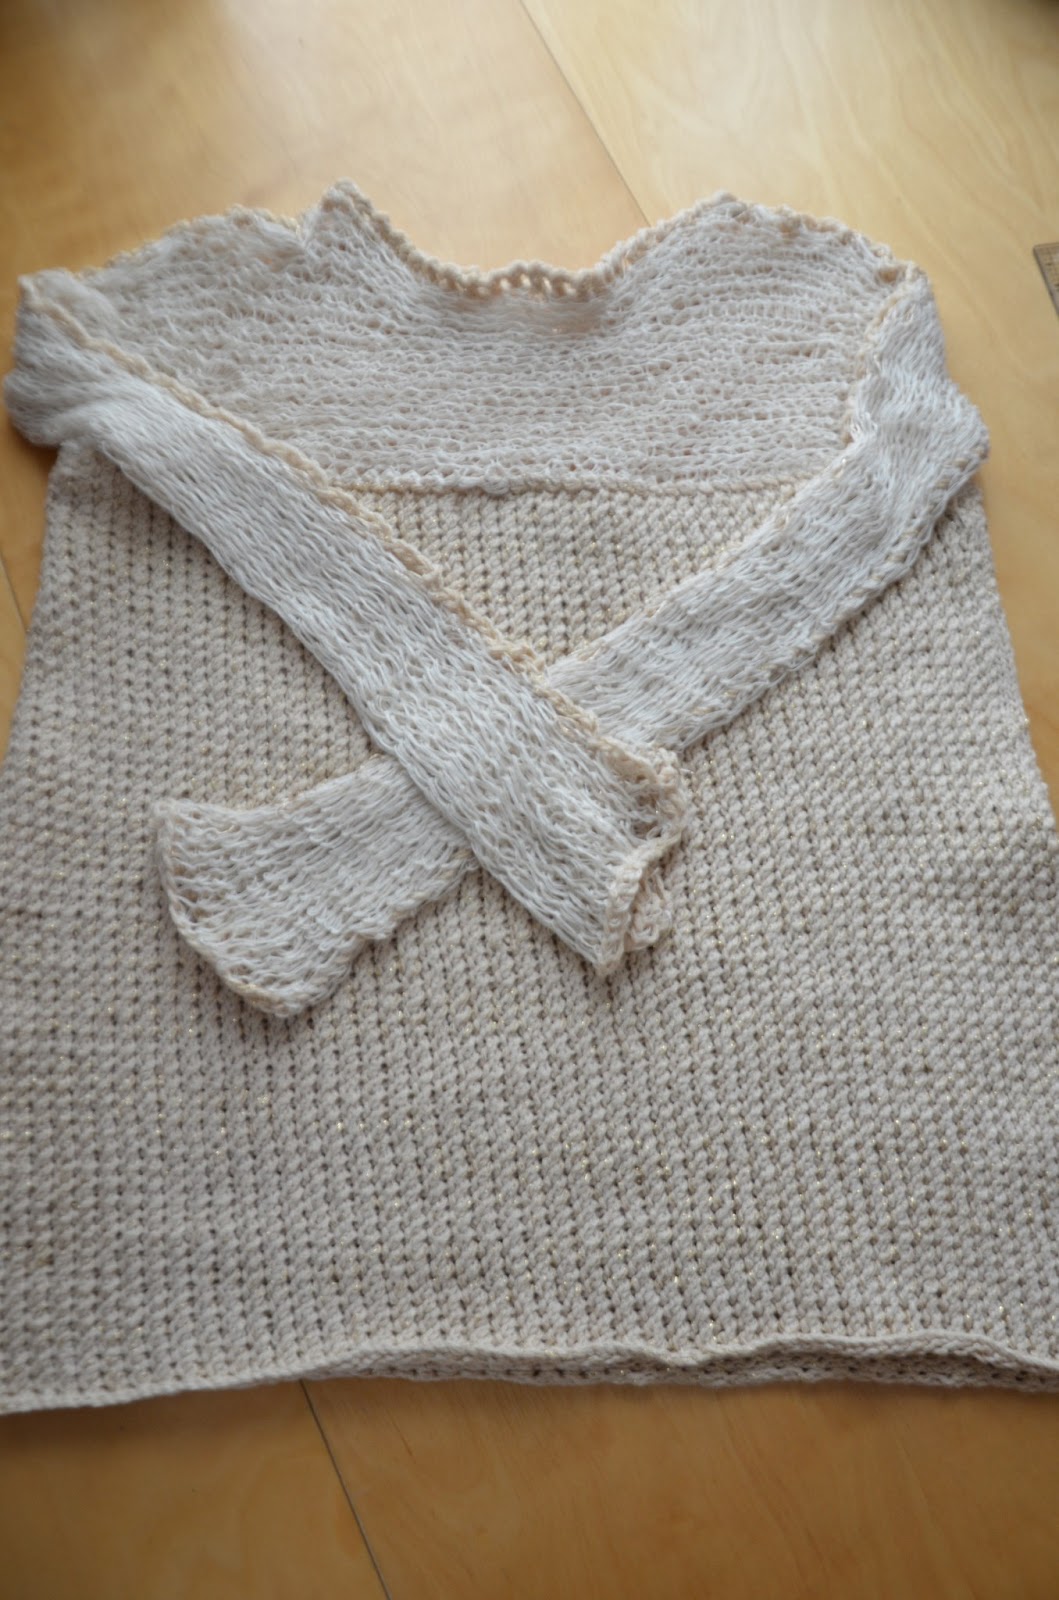
So, I began an ivory pullover from last year’s Stacy Charles summer booklet. I finished knitting and assembling but I am not done with it. Why? The top bodice is constructed by two long pieces of pre-knitted tape, Celeste. I don’t think I did such a good job dealing with ends. I can live with the mess, however. What I cannot live with is the fact that the top edge of the lower bodice crosses my chest in a very awkward place. This is caused by the lower bodice being rather dense and heavy due to the stitch pattern and the pre-knitted tape is stretched too much above it. Fortunately, I have a piece of skin-colored knit fabric at hand. I am planning to sew a truncated tank top sort of thing to support the heavy lower bodice. We shall see.

Here are photos of the pullover.  The front and the back are exactly the same.  I know, I know, they should not be the same but among the knitting designs, it is quite common to see this symmetry between them.  I think we knitters tend to trust in the stretchy fabric to take care of differences between the front and the back, and I think it is okay to do so up to a point. 


The next challenge is to knit Nidden from Norah Gaughan booklet no. 8 with 13 skeins of now discontinued Berroco Denim Silk. First off, gauge is not right. I've knitted a cardigan with Denim Silk before using 4.5 mm needles and I love the resulting drapey fabric. I tried 3.75 mm needles per pattern instruction and did not like the stiff fabric. Besides, in my crude calculation, I do not have enough skeins. So, I went up to 4.5 mm needles.

Nidden is constructed in such a way that front pieces with the lace pattern continue beyond shoulders and meet at the center back. The design uses the stretchy nature of the knitted fabric to overcome curved and rounded shape at the shoulders and along the neckline. The gorgeous lace pattern takes up 61 stitches. Given that my gauge is 18 stitches per 4”, it means I will have 13.5” of upper back covered by the continuous front pieces while it ought to be about 10.5” for my size. Besides, I will run out of my yarns. The only way out is to reduce the width of the lace pattern although the lace design will be noticeably altered. I need to think about how to modify the lace design.

In the mean time, I started knitting the back piece. With the help of my manikin, I should be able to figure out how I ought to modify the front pieces.


You see, my summer knitting is nothing but easy.

Sunday, June 30, 2013

Tunisian Crochet Project

I have been working on a lovely tunic from last year's Vogue Crochet magazine, #32 . This project is one of several Tunisian crochet projects in the magazine I liked and especially I like #37 besides #32. By the way, this is my first time taking up Tunisian crochet. So, how have I been doing?  Well, so far so good, although with a lot of trial and error. For example, I am currently working on my third sleeve and I will need to make a fourth one: i.e. my first two were not good at all.

First of all, the yarn used.  I have had seven balls of Jojoland Melody, a light fingering weight yarn, in navy blue/burgundy mix for several years.  I thought they were perfect for the tunic. The original design was crocheted with Koigu KPPPM using 5 mm hook.  Melody is thinner and less meaty than Koigu and I decided to start with 4 mm hook.

Before taking a plunge, I did some practice with 4 mm hook and obtained the gauge of 21 stitches and 10 rows for 4” by 4” square. I thought I was ready.  Since I was not certain about the yarn amount, I did some crude calculation and concluded that I had to be able to complete one sleeve with a ball of Melody.

As usual, I started with a sleeve when not certain about the gauge or the design. With my gauge, 16.5” meant 87 stitches. I think the pattern instruction has the cast on numbers for sleeves wrong. It should be 78 stitches with the gauge and the intended length. When I was almost done with the first ball of yarn, I had still some inches to complete one sleeve. Not good at all! I had to make the garment smaller (not a good idea), or go up on the hook size to make the fabric less dense. I took the latter option and restarted with 5 mm hook.  Assuming I was not too far off from the gauge in the instructions, I started with 78 stitches. 


When I completed the second sleeve I noticed that the fabric was too stretchy at the lower half than the upper half (see the photo above).  Also, I noticed a severe biasing of the fabric towards right. Apparently, this biasing is typical for Tunisian crochet. I was not happy with the completed sleeve at all. Looks like I was still learning how to maintain the tension with the first half of the sleeve. What do I do? I contemplated for a few days and decided to start again. I hate to regret too late. So, here I am, working on the first good sleeve. I am crossing my fingers!


Sunday, June 16, 2013

Lovely Orkney Cardigan, Part 2

Now a shocking discovery to report. I made a major error in knitting the bodice of Orkney: I forgot to make button holes. I was drawn to Orkney for its clean front edge without button bands, yet I forgot to knit button holes! I realized this error when I was decreasing stitches at shoulders. Too late, I said. I need to figure out how I could force button holes.

I recalled reading about button holes can be made after completing by manipulating yarns around a stitch. That’s what I decided to do. I was worried that ‘manipulation’ and ‘coaxing’ of yarn might cause too much wear and tear. In order to provide some support, I decided to use petershams for facings instead of knitted ones.

Here is what I did. I used 1” wide petersham tape for the left front, and two stripes of ½” wide tapes, sewn together except for button holes, for the right front. After the petershams were applied, I gently forced button holes on the knitted bodice. Ah, when I was applying the petershams, I realized that my steeks was too wide since the button hole had to be made through steeks as well. This was to be avoided. So, I had to re-work crochet anchoring and cut off excess.

The photo below shows the left front facing sewn on, and the right facing being assembled.


The right facing sewn on the right edge with button inserted in the button holes. 


And, here is it.  Finally done!  All the buttons are sewn and corresponding holes are made.


One more note on the project. The color Mineral was used in sleeves only. I have a lot of it leftover. The yarn amount was all sufficient even though I added steeks. The least amount left was in Billberry.


It is too warm to wear Orkney now.  Must wait for some cooler days to come back. 


Saturday, June 15, 2013

Lovely Orkney Cardigan, Part 1

First of all, I love the colors in Orkney. The colors of Rowan Felted Tweed yarns are so well coordinated that any combination of the muted hues seems to be pleasant and beautiful. I also love the clean front edge without button bands. Since the magazine came out, I was in love with Orkney.

One thing I did not like about the design was its instruction, written to knit pieces in flat, back and forth. Like many knitters, I dislike knitting Fair Isle designs flat. I decided to add steeks to bodice and sleeves. Yes, sleeves. Since knitting in circle with small circumference is not my forte and I have tension issues, I decided to knit two sleeves together with steeks added between them.

So, I began knitting sleeves as I often knit them first as a swatch alternative. I was lucky this time and stitch gauge was spot on. My row gauge seemed okay as well. I knitted two cuffs flat first so that steeks won’t show at the cuff edges, and placed them together on a circular needle with eight-stitch steeks added. It so turned out I could have used six- or four-stitch steeks since there are edge stitches. Instead of following the pattern instruction in words, I followed the chart. As I could not see the line for the size M clearly in it, I ended up with having six extra stitches, three on each end, for size M. In order to accommodate this addition, I increased the armhole depth somewhat.


Fronts and beck bodices were also knitted together with an eight-stitch steek added between the fronts (this should have been a four-stitch steek so as not to have too much fabric at front edges). I cast on 248 stitches for the ribbed edge and knit: k3, k2 p2, repeat * to , k3 (the first and the last stitches are edge stitches). On row 1 of the Fair Isle section, add two stitches to front bodices and one stitch to the back bodice, with the total of 253 stitches for bodice. I placed markers after 65th and 188th stitches to indicate the side seams. Also I marked the center back stitch to aid anchoring the motif. When the Fair Isle chart was inspected, I noticed that the center back is not necessarily the middle of each motif. I shifted motifs as necessary to remedy this defect. I decided to make the cardigan longer and chose to knit 35 cm before armhole shaping began. Also, the armhole was lengthened to 21 cm.

Here are bodice, left, and sleeves before cutting steeks. 


Sleeves alone.

 
And after sleeves were put together.


I found the sleeves to be just right in tightness and the cuffs are nice and snug.  Some knitters mentioned sleeves being tight and I am wondering if it was due to knitting them in round in small circumference. 

I just adore the colors of the garments!  Now, the next post will be about a disaster and how I overcame it.


Saturday, June 08, 2013

MMM'13

It is already June 8th!   I cannot believe it. I'd better write up my reflection on MMM'13.

My goal and hope in participating the group was to get back my creative thoughts through fellow MMM'13 participants.  Given this goal, the best thing I accomplished is that I did write about my creative activities, albeit those in the past. Let’s face it. It takes a chunk of time and efforts to maintain a blog: photos must be taken and materials must be considered.

Another accomplishment is that I got inspired to sew through members of MMM’13. I am planning a new sewing projects. I have had difficulty with sewing projects for so many months. Thanks all for inspiring me!

Although I have not looked through all the photos as of today as there are six thousand plus photos, I was hugely inspired through all that I had seen. I am glad to know there are so many of you out there sewing, knitting, and crafting every day.

So, thank you, Zoe, and all the members of the group. I am looking forward to be more creative.


In terms of my current projects, I have been planning a couple of skirts in a teal green cotton fabric. This idea came to me as I was taking photos for MMM'13. I though I needed a skirt in dark green. I am mildly excited about the project.  I also finished knitting Orkney cardigan. All I need to do is its assembly which involves a bit of inventing. I made a major error in knitting the bodice: I forgot to make button holes. You see, Orkney does not have button bands. That was one of the features I liked in Orkney, yet I forgot button holes. How I managed to deal with my mistake will be another post.

A post without a photo seems sad. So, here is what I put together with flowers gathered from my garden.


Saturday, June 01, 2013

Fifth Week of MMM'13

My fourth and fifth week of MMM’13 went rather poorly due to illness and subsequent medical appointments which were too many for me to handle. At any rate, I managed to do one more MMM day.

Day 30


I made this pair of pants in 1984 with one of the first Vogue Issey Miyake patterns, 1257, with black summer wool.  It became too small at waist soon after that, and sat in my closet for a long time, twenty plus to be honest.  I finally removed the waist band and waist tucks last year and replaced it with an elastic band.  I feel as though I now have a brand new pair of pants.


I made four garments in 1980's out of the above pattern: a black shirt, a black wool blend jacket, a white cotton/linen blend jacket, and the black pair I just fixed.  The shirt got rotten long ago, but the jackets are still in good shape.  My 17-year old daughter loves the jackets and wants to borrow from me.   She has a good taste.  Ha, ha. 

Lastly, but not the least, Zoe, thank you for organizing this fabulous event!  I will post on what I learned shortly.

Sunday, May 19, 2013

Third Week of MMM'13

The last week started with a temperature typical of New England and ended with the same condition: colder than it should be.  Thankfully, there was a few days with warmer temperature. 

Some of you may already know, but I have knitted many wool jackets and cardigans in the past and I do not pull them all out each winter season.  In the middle of the season, I put some back into the back of the closet and take some others out.  At this time of the year, I do not want to take out more since Summer is coming soon.  Hence, I am wearing the same things over and over again.  It better get warmer next week. 

Day 13

Our radiator was working Monday morning.  So, I wore the same Vogue dress as Day 9 with Jo Sharp's Origami Bolero and a sermon pink wool gabardine coat (RTW) from my younger days: i.e. 30 years ago.

Origami Bolero was fun to knit for several reasons.  The yarns were all so gorgeous, especially Alpaca Silk Georgette.  I have some more in my stash to be made up into a sweater or two.  Also the colors are very nice with subdued hues, very sophisticated in my opinion.  I think what was most striking about this project was the color combinations and stitch patterns.  You would mix yarns with different weight ranging from Aran to sports in the same stitch pattern as if they are of the same weight.  It created interesting fabrics  


Day 14

Practically the same outfit as Day 4, except for the top under the green Aran jacket.  I was wearing Thia Tee by La Fred I made in 2002. 


 Day 15

The same outfit as Day 2, RTW black skirt and knit top, but with a long vest on top.  The vest was knitted in 2003/2004, Elizabeth of York Vest from Tudor Roses by Alice Starmore. 


 Day 16

Finally warm weather had arrived here!  I wore an orange cotton pullover, Jasmine from Kim Harvreaves’ Nector and a pair of poly/rayon pants, Vogue 7301.  I’ve made four pairs of pants/capris from this pattern in 2005/2006.


Day 17

Me made the blouse, Vogue 7935 blouse view C made in 2005, that I wore on Day 3, and the skirt, Vogue 2558 Montana pattern from years ago made in 2003. 


Day 18

Me made the jacket, Vogue 1522 Perry Ellis pattern I made in 1986 with very thick black linen, and the top, Textile Studio Monaco Shell 1209 I made in 2003.  The capris are RTW.  I love this printed stretch lace fabric.  The top is backed by light blue stretch knit.


Monday, May 13, 2013

Second Week of MMM'13

This week went by faster than the last.  We had mostly chilly and wet days with some warm afternoons.

Day 6
Monday's outfit was very special to me and it deserved its own post (the last one).

Day 7


Tuesday was still chilly in the morning and I put on a cotton pullover, a wool cardigan, and RTW cotton pants.  The pullover is Jan sweater from 'A Stitch in Time' by Susan Crawford.  This book contains vintage designs from 1930 to 1959.  I am eyeing on several designs.  I wore the same cardigan last Saturday.  I love this design so much that this green one is the second one I knitted.  The first one was the yellow one.

Day 8


Initially I felt it was still chilly as it was drizzling when I woke up and put on a wool cardigan.  After the breakfast, it began to warm up quickly and I had to change into cooler top.  The tank top and the pants are RTW. 


The wool cardigan is called Rød/Maple Leaves by Marianne Isager in her book 'Japanese Inspired Knits.'  This book also contains several designs I just adore.  The cardigan is supposed to be knitted with intarsia method using yarn bobbins, one bobbin per stripe.  I did not like the idea of having 16 bobbins to deal with every row, and I decided to knit each stripe separately first, and put together by the three needle bind off method.  It took quite a long time to complete, but I am quite satisfied with the result.  I used Isager Spinni in grey and blue shades which was held together with Harmony by Jojoland.  The latter is a self striping lace weight yarn in the shades I picked for Spinni.  For three-needle-bind-off, I used chartreuse green Spinni.  I had to rewrite the pattern for each stripe, which in itself was an interesting pattern reading exercise.  If you are interested in the detail and are a member of Ravelry, you can find more detail here.

The cotton pullover was knit with a super bulky yarn called Samantha, which I purchased at heavy discount from my LYS.   Unfortunately, the yarn is discontinues some years ago, hence discount, and my LYS closed its door last fall.  I am really disappointed with the store closing.  I was spoiled in a way as the store was located in a few blocks from my office.  Sigh.  At any rate, the pullover has very interesting stitch patterns and was fun to knit. 

Day 9


I wore three items of my creation today: The red coat with crazy colorful print lining worn on day 1;  Sounds of Silence cardigan by Irina Poludnenko knitted using exactly the yarn required: Filatura Di Crosa Golden Line Superior and Nirvana in gray; and Vogue 1119 Donna Karan dress in stretch knit.  I made a lot of modification to the dress pattern to fix the gaping armholes, to shorten the bodice, and to shorten the skirt.  It worked out really well, although it cannot be seen much from the above photo. 

Day 10


Again, I wore my red coat.  Under the coat was Blithe tank top by Kim Hargreaves.  I finished it in October 2011 and this was probably the second time I put it on.  What you see in the above is a part of my narrow den where I do sewing.  I am standing between my cutting table, which is too low for the task and I need to do something about it, and the bookcase which is about a foot length to my right. 

A peek at what I am knitting right now.


Day 11


I took advantage of the clear morning to take some photographs of my flowers.  My tree peonies are doing well and the dark pink one is about to bloom (not shown above).  I am wearing a hooded jacket from Classic Elite Yarn's booklet New Harbor.  The original does not have any zipper, but I decided that I want one.  I found a two-way zipper by RiRi. 

Now, it is said that the next several days are going to get colder.  Good thing that I still have my wool sweaters around. 


Monday, May 06, 2013

Happy and Older Creation

The last and probably the only occasion where I was really creative was when I knitted the cut-away boucle jacket in 2005.  I had this beautiful Noro Shinano yarn in mixed green and ivory which I bought on sale with no dedicated project in mind.  I just loved the color and feel of the yarn which is wool/silk blend. 

I swatched with different patterns but I was not happy at all even after using up entire ball.  Then I realized that it needed some more colors, fuzzy colors.  So, I bought several worsted weight mohair yarns in orange red, greens, and blues, some of them were heathered colors.  One of them was a mohair loop yarn.  Instead of striping mohair yarns with Shinano, I made a magic ball: a ball of yarn made by cutting and knotting lengths of yarns.  I think I cut the mohair yarns in about 15” long pieces.  I did not measure them.  Just cut them approximately.  Then tie them into a ball of yarn by selecting different yarns randomly. 
I began swatching with the following stitch pattern:
With Noro Shinano cast on, and knit two rows (garter stitch).  Third and forth rows are knit with magic ball *knit 1, slip 1 as if the purl with yarn in back *, repeat * to * on row 3.  On row 4 slip all the previously slipped stitch with yarn in front as if to purl and knit all the knitted stitches.  Rows 5 and 6, garter stitch with Noro Shinano.  Rows 7 and 8 are similar to rows 3 and 4 except slipped and knit stitches are reversed so that the mohair yarns show in staggered pattern rather than lined up. 


Initially, making the magic ball made me feel so wrong: Cut up yarns and then tie them up every 15”!  But, when I saw the swatch, my feeling of guilt went away. 
The pattern I selected was design #1 from VK magazine Winter 2004/2005 issue, without the back pleat.  I reversed the right and wrong side of knitting along the lapel line in the front bodices.  To finish it up, I added a braided trim along the edges and cuffs.  I used the orange red mohair yarns and a bright red angora yarn I had in my stash for the braid.  After a few wearing, I noticed that the jacket was losing its shape and thought it needed a lining.  I bought beautiful lightweight polyester fabric in hand-paint like print in greens and blues, lined the whole jacket except for the lapels and the collar, and hand quilted throughout.  The lining pattern was made up by simply placing the jacket on a blank sheet of paper and traced it.  I had to make certain that the pattern is symmetric.  That was all what I did. 


This was such an organic project and I love the result. 
The only problem is that it is an orphan at this point.  I had a dark green knitted short skirt, but I have grown a bit since then.  All I could come up with in my wardrobe was the tweed skirt.  It is not too bad together, but not good enough.  So, I should dig up my stash in search of dark green fabric!

Sunday, May 05, 2013

First Week of MMM'13

The first week of Me-Made-May 2013 was fun thanks to so many participants from all over the world.  There are some serious crafters among them who make just about everything.  Hats off to them!  I am with one or two handmade item a day, maybe three, at most.  Also, to my joy, I saw Japanese participants as well.  はじめまして!  How do you do!

Although I would like to sew something during the month of May, I am not sure how much I can accomplish.  My knitting is likely to take weeks to complete.  So, what I will post on the group will be mostly what I have made in the past.  My craft history goes between sewing and knitting in a almost dichotomous way.  Somehow it is so  hard for me to do both in a week.  Also I did a lot of sewing while I lived in California and North Carolina.  There were not much needs for sweaters then.  Now, living in New England, I've been knitting mostly. 


Day 1: Coat and pullover
Yuri Kaneko’s Retro coat from her book ‘Yuriko Kaneko’s Oshare Note’ .  It was sewn with a red silk noil from Michael's bundle purchased some years ago.  I did not have enough yardage and had to do away with the pretty front seam line between the side and front panels.  Also the coat does not have pockets.  This is really impractical for a coat.  I may add them later.  The lining is a Picasso cotton print I bought a long time ago.  It is really fun, but was not sure how I could wear it. 

Love Notes Pullover from Tahki Yarns Spring/Summer Collection Collage booklet.


Day 2: Scarf blogged here.

Day 3: Scarf, Skirt, and Blouse
The same scarf as Day 2.

The skirt was made in 2004, a long time ago, with Burda 9/99 #199.  It was modified to include gores between center and side panels and the length shorten by 14.5 cm.  The gores were cut with cross grain.  I used a wool herringbone in maroon and black, bought in Japan when I was in the early 20's.  This skirt was the result of inspiration I got from an illustration in the then recent Thread magazine.

The blouse is old as well, from 2005.  Vogue 7935 View C, a long sleeve blouse, with a rayon print from Fashion Fabrics Club.

Day 4: Skirt and Jacket
A long bias-cut skirt made in 2004 with Burda 8879 View A, and Norah Gaughan’s tweedy aran cardigan knitted last year 2012.

Day 5: MMM'13 Break
Today, I am summarizing my week's posts.  I see many funky garments posted on the group photo page and I feel jealous.  Looks to  me that my choice of garments got boring and less exciting over the years.  I think it is time that I sew something interesting, rather than practical, maybe not for myself, but for my teenage daughters.  How about that? 

Friday, May 03, 2013

Me Made May 2013

It has been difficult for me to write about my creative activities because I did not feel creative.  I was knitting mostly to keep myself occupied.  I wanted to get inspired but did not have any idea how.  Then, I happened by this Me-Made-May 2013 post.  I thought, maybe.  Then, I saw Great British Sewing Bee.  The show made me realize that I have been missing fun for too long.  I decided.  I've got to do something.  So, here I am.

I, May of May Studio, sign up as a participant of Me-Made-May '13. I endeavour to wear whatever I made each day or as many times a week as possible for the duration of May 2013.

My goal and hope is to get back my creative thoughts through fellow MMM'13 participants. 

One Ring Scarf

My DD1 is a big fan of LOTR and found the One Ring Scarf Pattern on Ravelry.  It was last year, probably in October.  Neither she nor I had done double knitting and she wanted me to knit along with her.  What can a mother do?  I agreed.  It took us some weeks to decide on the right yarns and we ended up choosing Drops Alpaca which is a very soft 100% alpaca yarn in sport weight.  In case someone wants to use the same yarn, we used up about 2 and a half balls each in two colors.  I chose red/black mix and black, and DD1 chose dark grey and dark turquoise.  Since I knit relatively loosely while she knit rather tightly we used different needles: mine was 2.5 mm and DD1's was 3 mm.

We cast on with the invisible cast on method, although we should have used provisional cast on method since we ended up grafting the end rows to the cast on rows in order to form a ring.  For the edging, we used the slipped stitch method by Melissa shown in YouTube video titled “No Twist, Slip Stitch Edging for Double Knitting.”  We both love the edging produced by this method.  It made a huge difference. 

The links to youtube tutorials we used:
 Our finished scarves. 

 DD1 grafting the last row to the cast on edge. 
 DD1 finished hers two months ago, while mine was finished at the end of April.  Still, I am really happy with the result.