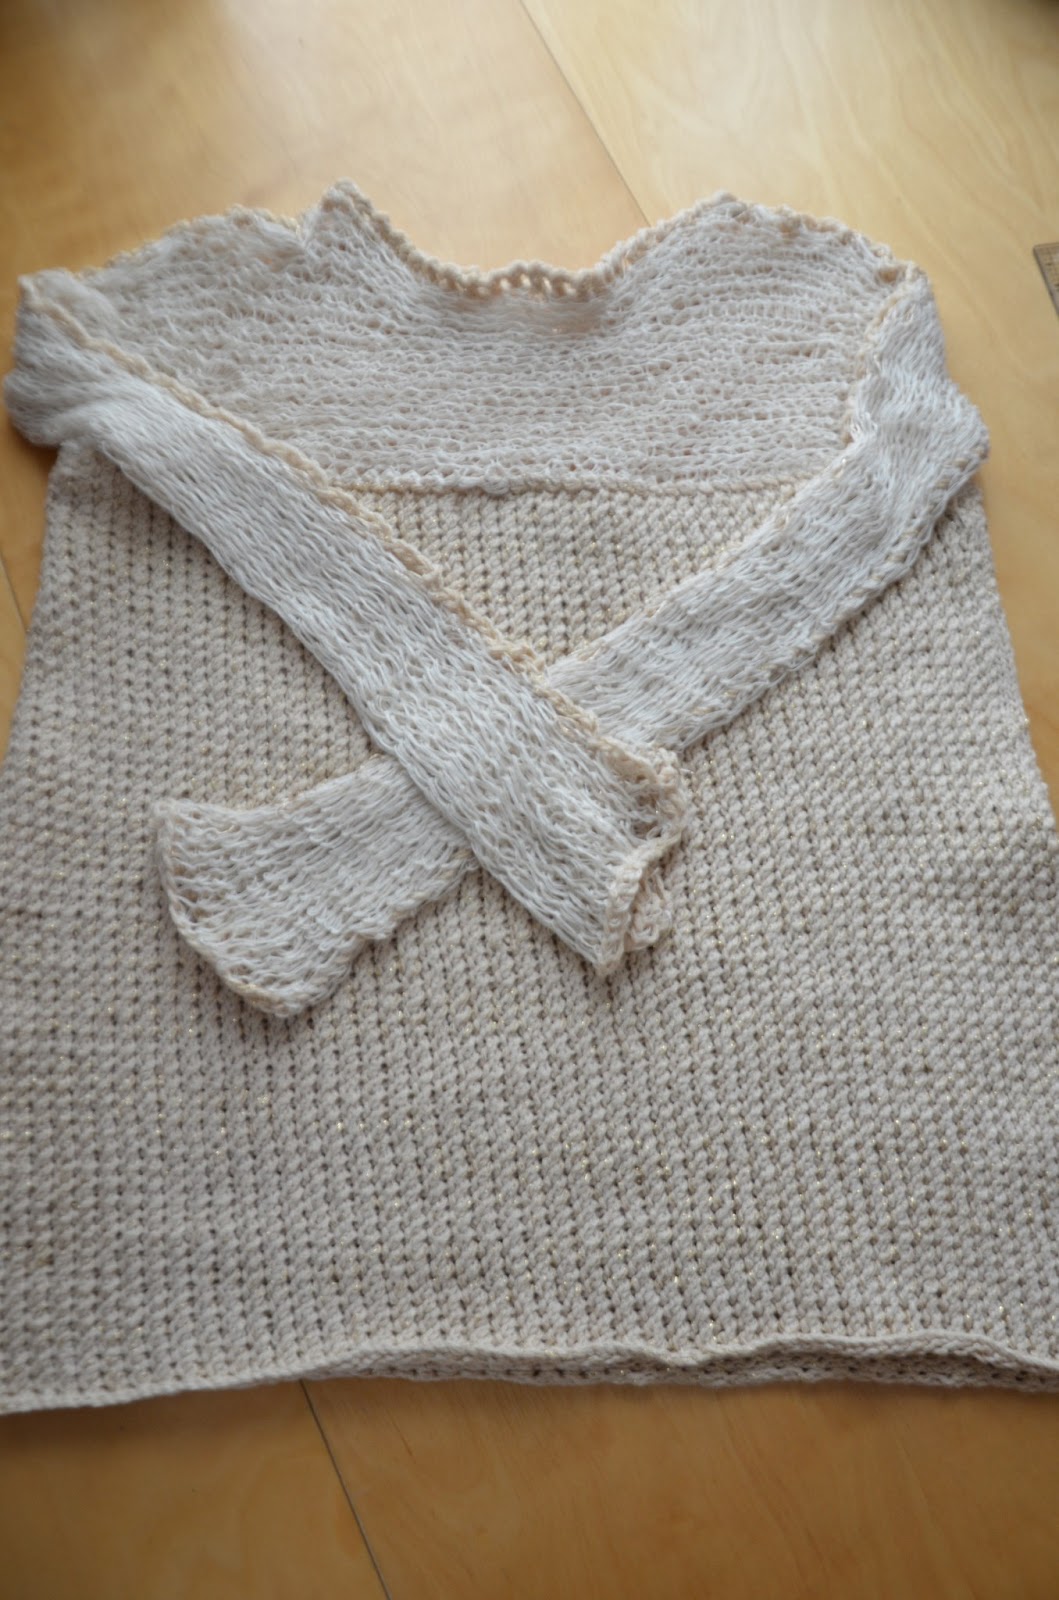
Next, another bulky project using the same airy yarn as the vest. It was a pullover by Norah Gaughan, Maison Delaunay. The garment shape is quite unusual for me, a sort of trapezoid. My friends at KnitSmith loved it.
Showing posts with label Norah Gaughan. Show all posts
Sunday, February 15, 2015
Bulky Quick Knits
After the long project was finally completed, I needed quick projects. So, naturally, I chose to knit garments with bulky
yarns. One was a vest which I knitted
once already. I love it so much that I
wear it constantly. So, another one was
in order. This time, the yarn I chose
was less substantial and more airy. As
a result, the vest turned out to feel a bit different. Nevertheless, I love it. The only problem was that the front neck line
was too low. It was fixed by use of a
pin.
Next, another bulky project using the same airy yarn as the vest. It was a pullover by Norah Gaughan, Maison Delaunay. The garment shape is quite unusual for me, a sort of trapezoid. My friends at KnitSmith loved it.
Sunday, August 25, 2013
Summer Projects Update
Since my last post, I completed Nidden after much struggles, and a support structure was added to Madonna pullover.
Changes made to Madonna pullover: I did backward single crochet to finish the neck edge, a much simpler edging than the original. Also, I added more stitches along the neck edge than instructed. I do not like a close fitted neckline for warm weather garments. A supportive structure was added. With it, the neckline felt more comfortable and the garment is now wearable.
What I wish I had done to Madonna pullover: I wish I did some garter rows at the bottom edge. I do not like curling in this garment. I ended up applying a Petersham band to the bottom edge to control the curling. The photo below shows both the support and the Petersham band applied.
It is a tricky garment as Madonna is a bit too dressy for my everyday needs. As a matter of fact, I am not sure what to wear with it. My daughters insisted only jeans would go with it.
Nidden was a lot of work because I knitted the back twice and the left front three times. Other than that, it turned out really nice. There are so many changes made in my version because of the differences in gauge and the yarn quantity limitation. It will be too much to list them out.
Changes made to Madonna pullover: I did backward single crochet to finish the neck edge, a much simpler edging than the original. Also, I added more stitches along the neck edge than instructed. I do not like a close fitted neckline for warm weather garments. A supportive structure was added. With it, the neckline felt more comfortable and the garment is now wearable.
What I wish I had done to Madonna pullover: I wish I did some garter rows at the bottom edge. I do not like curling in this garment. I ended up applying a Petersham band to the bottom edge to control the curling. The photo below shows both the support and the Petersham band applied.
It is a tricky garment as Madonna is a bit too dressy for my everyday needs. As a matter of fact, I am not sure what to wear with it. My daughters insisted only jeans would go with it.
Nidden was a lot of work because I knitted the back twice and the left front three times. Other than that, it turned out really nice. There are so many changes made in my version because of the differences in gauge and the yarn quantity limitation. It will be too much to list them out.
- The top of the back bodice was kept straight after 4" was completed above the armhole shaping.
- One of the major changes I made was to reduce the original 61-stitch lace pattern to 45-stitch pattern, and then to 43 stitches: Two stitches at 1-by-1 rib at each side, four stitches on each wavy pattern, and four stitches at the center motif, with the total of 16 stitches reduced. I also replaced k 2p k with k p k between the wavy pattern and the side rib pattern to reduce two more stitches from 45 to 43. By changing the stitch count, the motif height is also reduced from 28 rows to 20 rows. I was able to keep the similar look of the original lace pattern. The back lace section is on the left side on the photo, much wider than that on the front shown on the right.
- Another change was the sleeve head. I placed the assembled bodice onto my dress form and slipped a sleeve of my Gomashio cardigan which was knitted with the same yarn some time ago. The sleeve fitted Nidden well and I decided to use Gomashio sleeve pattern instead:10” cuff width, 16” underarm length, and 5 1/2” sleeve head height. For the cuff, I did 56 rows of the pattern stitches which got stretched to 10”. Picked up 45 stitches from the cuff and knit 94 rows before sleeve head shaping began. The width of the sleeve was increased every 20 rows four times, 53 stitches total. Cast off 4 stitches at each end to begin sleeve head shaping, Row 95, with 45 stitches remaining. Every two rows, one stitch decreased at each end for 11 times total, and every 4 rows four times, leaving 15 stitches on the needles. Cast off 15 stitches.
Overall, I am satisfied with Nidden and I love its back. So pretty.
Sunday, July 21, 2013
Summer Knitting
So far, my summer knitting has involved a lot of trial and error and struggling.
I challenged myself and picked up a new technique, Tunisian crochet. I was not that interested in simple Tunisian crochet, but I fell for gorgeous lace patterns. I am not working on it as much lately since the yarn I am using for the project is wool and I have issues working on wool in summer, especially during last week when the temperature hit 99F/37C!
So, I began an ivory pullover from last year’s Stacy Charles summer booklet. I finished knitting and assembling but I am not done with it. Why? The top bodice is constructed by two long pieces of pre-knitted tape, Celeste. I don’t think I did such a good job dealing with ends. I can live with the mess, however. What I cannot live with is the fact that the top edge of the lower bodice crosses my chest in a very awkward place. This is caused by the lower bodice being rather dense and heavy due to the stitch pattern and the pre-knitted tape is stretched too much above it. Fortunately, I have a piece of skin-colored knit fabric at hand. I am planning to sew a truncated tank top sort of thing to support the heavy lower bodice. We shall see.
Here are photos of the pullover. The front and the back are exactly the same. I know, I know, they should not be the same but among the knitting designs, it is quite common to see this symmetry between them. I think we knitters tend to trust in the stretchy fabric to take care of differences between the front and the back, and I think it is okay to do so up to a point.
The next challenge is to knit Nidden from Norah Gaughan booklet no. 8 with 13 skeins of now discontinued Berroco Denim Silk. First off, gauge is not right. I've knitted a cardigan with Denim Silk before using 4.5 mm needles and I love the resulting drapey fabric. I tried 3.75 mm needles per pattern instruction and did not like the stiff fabric. Besides, in my crude calculation, I do not have enough skeins. So, I went up to 4.5 mm needles.
Nidden is constructed in such a way that front pieces with the lace pattern continue beyond shoulders and meet at the center back. The design uses the stretchy nature of the knitted fabric to overcome curved and rounded shape at the shoulders and along the neckline. The gorgeous lace pattern takes up 61 stitches. Given that my gauge is 18 stitches per 4”, it means I will have 13.5” of upper back covered by the continuous front pieces while it ought to be about 10.5” for my size. Besides, I will run out of my yarns. The only way out is to reduce the width of the lace pattern although the lace design will be noticeably altered. I need to think about how to modify the lace design.
In the mean time, I started knitting the back piece. With the help of my manikin, I should be able to figure out how I ought to modify the front pieces.
You see, my
summer knitting is nothing but easy.
I challenged myself and picked up a new technique, Tunisian crochet. I was not that interested in simple Tunisian crochet, but I fell for gorgeous lace patterns. I am not working on it as much lately since the yarn I am using for the project is wool and I have issues working on wool in summer, especially during last week when the temperature hit 99F/37C!
So, I began an ivory pullover from last year’s Stacy Charles summer booklet. I finished knitting and assembling but I am not done with it. Why? The top bodice is constructed by two long pieces of pre-knitted tape, Celeste. I don’t think I did such a good job dealing with ends. I can live with the mess, however. What I cannot live with is the fact that the top edge of the lower bodice crosses my chest in a very awkward place. This is caused by the lower bodice being rather dense and heavy due to the stitch pattern and the pre-knitted tape is stretched too much above it. Fortunately, I have a piece of skin-colored knit fabric at hand. I am planning to sew a truncated tank top sort of thing to support the heavy lower bodice. We shall see.
Here are photos of the pullover. The front and the back are exactly the same. I know, I know, they should not be the same but among the knitting designs, it is quite common to see this symmetry between them. I think we knitters tend to trust in the stretchy fabric to take care of differences between the front and the back, and I think it is okay to do so up to a point.
The next challenge is to knit Nidden from Norah Gaughan booklet no. 8 with 13 skeins of now discontinued Berroco Denim Silk. First off, gauge is not right. I've knitted a cardigan with Denim Silk before using 4.5 mm needles and I love the resulting drapey fabric. I tried 3.75 mm needles per pattern instruction and did not like the stiff fabric. Besides, in my crude calculation, I do not have enough skeins. So, I went up to 4.5 mm needles.
Nidden is constructed in such a way that front pieces with the lace pattern continue beyond shoulders and meet at the center back. The design uses the stretchy nature of the knitted fabric to overcome curved and rounded shape at the shoulders and along the neckline. The gorgeous lace pattern takes up 61 stitches. Given that my gauge is 18 stitches per 4”, it means I will have 13.5” of upper back covered by the continuous front pieces while it ought to be about 10.5” for my size. Besides, I will run out of my yarns. The only way out is to reduce the width of the lace pattern although the lace design will be noticeably altered. I need to think about how to modify the lace design.
In the mean time, I started knitting the back piece. With the help of my manikin, I should be able to figure out how I ought to modify the front pieces.
Tuesday, March 10, 2009
Yellow Tweedy Cardigan
I started to knit this cardigan on January 1, 2009. It is knitted with about 7.2 skeins of Peace Fleece in Khrushchev Corn Yellow. I love this shade of yellow.


I bought this yarn a few years back, way before Ravelry, when I visited yarn stores in Maine and New Hampshire with my knitting friends. Ordinarily, I would not consider yellow for myself, but this one was different. I am not a color theory expert and I have no idea what makes this yellow so different from the other ones. I fell in love and bought some skeins without having a particular project in mind.
Then, came Ravelry. After becoming a huge fan of Norah Gaughan, I would look for her designs and marvel them on Ravelry. Then I happened to see Norah's Tweedy Aran Cardigan from Interweave Knit magazine 2001/2002 issue in many different yarns and colors. Some of the finished projects were actually knitted with Peace Fleece. Then, I knew that I had to knit it with my yellow Peace Fleece. Given such a useful tool as Ravelry, I started to study the finished garments. I noticed that I liked versions which looked much longer than the others. I thought the longer versions show off waist shaping better. I also looked at button choices made by fellow knitters. Truly, Ravelry adds such an interesting dimension to knitting.
Now, about Norah's pattern. I love her fancy rib stitches: very stretchy and highly textured rib stitches. I almost thought of using them for entire sleeves but I decided that it might be too much for my poor wrists as this yellow Peace Fleece was quite hard on my hands in twisted stitches and cables. The photo below shows the texture of the fancy rib stitches best.

To make my life easier in executing fancy rib stitches, I took an extra step and rearranged stitches for easier knitting: Slip the first stitch to the right needle purl-wise and slip the second stitch knit-wise. Place these two stitches back to the left needle. Notice that the right leg of the second stitch is now easier to access from the back. Proceed by knitting into the second stitch’s right leg, and, without removing stitches from the left needle, knit the first stitch’s right leg. Remove both stitches from the left needle. Note to self: Fancy rib stitches eat up a lot of yarn. Estimate more yarn if I ever knit the same cardigan and use the stitch on sleeves.
Here are the changes I made: Lengthen the bodice by about 2" and to add more waist shaping (instead of 5 times, I did 7 times). Instead of making button holes involving just one yo, I chose to use a similar method I employed for Winter Wonderland Coat and did one-row button holes over three stitches. The modification was made to strengthen the right edge of the holes. Cast off the first stitch by slipping it over the last stitch on the right needle (it looks like k2tog). The next two stitches are cast off without using the working yarn by simply slip the stitch over the next stitch twice. Turn the work around and cast on four stitches using cable cast on method. Turn the work around and knit (or purl) the first stitch on the left needle with the last cast on stitch on the right needle. For this last step, the last cast on stitch must be transferred to the left needle first.
I found nice black horn buttons with notches etched on the surface, mimicking the fancy rib stitch pattern. Overall, this was a quite satisfying project.

I noticed that it goes very well with my Noro Sock Scarf recently finished.
I bought this yarn a few years back, way before Ravelry, when I visited yarn stores in Maine and New Hampshire with my knitting friends. Ordinarily, I would not consider yellow for myself, but this one was different. I am not a color theory expert and I have no idea what makes this yellow so different from the other ones. I fell in love and bought some skeins without having a particular project in mind.
Then, came Ravelry. After becoming a huge fan of Norah Gaughan, I would look for her designs and marvel them on Ravelry. Then I happened to see Norah's Tweedy Aran Cardigan from Interweave Knit magazine 2001/2002 issue in many different yarns and colors. Some of the finished projects were actually knitted with Peace Fleece. Then, I knew that I had to knit it with my yellow Peace Fleece. Given such a useful tool as Ravelry, I started to study the finished garments. I noticed that I liked versions which looked much longer than the others. I thought the longer versions show off waist shaping better. I also looked at button choices made by fellow knitters. Truly, Ravelry adds such an interesting dimension to knitting.
Now, about Norah's pattern. I love her fancy rib stitches: very stretchy and highly textured rib stitches. I almost thought of using them for entire sleeves but I decided that it might be too much for my poor wrists as this yellow Peace Fleece was quite hard on my hands in twisted stitches and cables. The photo below shows the texture of the fancy rib stitches best.
To make my life easier in executing fancy rib stitches, I took an extra step and rearranged stitches for easier knitting: Slip the first stitch to the right needle purl-wise and slip the second stitch knit-wise. Place these two stitches back to the left needle. Notice that the right leg of the second stitch is now easier to access from the back. Proceed by knitting into the second stitch’s right leg, and, without removing stitches from the left needle, knit the first stitch’s right leg. Remove both stitches from the left needle. Note to self: Fancy rib stitches eat up a lot of yarn. Estimate more yarn if I ever knit the same cardigan and use the stitch on sleeves.
Here are the changes I made: Lengthen the bodice by about 2" and to add more waist shaping (instead of 5 times, I did 7 times). Instead of making button holes involving just one yo, I chose to use a similar method I employed for Winter Wonderland Coat and did one-row button holes over three stitches. The modification was made to strengthen the right edge of the holes. Cast off the first stitch by slipping it over the last stitch on the right needle (it looks like k2tog). The next two stitches are cast off without using the working yarn by simply slip the stitch over the next stitch twice. Turn the work around and cast on four stitches using cable cast on method. Turn the work around and knit (or purl) the first stitch on the left needle with the last cast on stitch on the right needle. For this last step, the last cast on stitch must be transferred to the left needle first.
I found nice black horn buttons with notches etched on the surface, mimicking the fancy rib stitch pattern. Overall, this was a quite satisfying project.
I noticed that it goes very well with my Noro Sock Scarf recently finished.
Sunday, June 08, 2008
Green Manon
After a visit to my LYS, I found two sets of suitable buttons for Green Manon. Not being sure which pair to use, it was decided that I ought to use them all. A chopstick on a chopstick rest kind of look, but I love it.
Despite Manon designed by Norah Gaughan being beautiful and interesting to knit, I had reservation on how it would look on me and I decided to change the upper body section a bit. The focal point of the design is in the peplum and its geometric design, and they are kept as they are. Modifications are made on the rest of the design to make the ribbed band at waist level and hence make the upper body longer. Some details on the modification are the following: skip two rows of ribbing every 8 rows on panel sections, which meant 48 rows removed from the ribbed band. It sounds a lot smaller, actually too small. However, remember that the ribbed stitches tend to turn out looser than the stockinet stitches. It was the right amount being removed for me. Next, re-calculate the number of stitches picked up for the upper body, lengthen the upper body section below underarm to about 5.5 inches, and add 4 stitches along the side seams on upper body section to compensate for the narrowed ribbed band. More re-calculation required to match the front and back shoulder seams. Peace fleece I used is not a smooth yarn and it feels rather scratchy against the skin. This garment will be worn over a top or a blouse and I made sure that it has enough ease built in it. If it were knitted with soft and smooth yarn, it could be very nice with no or scant ease, like the version I knitted for my sister. When the weather gets a bit cooler, more photos will be added.
Addendum: Finally the weather and my schedule cooperated. With my DD1's help, I have some photos. Me wearing Green Manon and a back view. I tried on the terra cotta version for my sister. Here and here. Terra cotta Manon is very snag and its shoulder width is too small for me. Nevertheless, I think it can be a nice warm weather cardigan with cotton or silk yarns.
Sunday, May 18, 2008
Norah Gaughan designs
I used to knit Fair Isle garments mainly. These days, I am all for cables and geometric designs. As soon as I learned that Norah Gaughan published new booklet series last fall, I had to get a copy. The first volume has many designs I just adore. I ended up knitting a shrug from her second volume first. Although it is designed for a summer yarn, I thought it might be nice with winter yarns. I had Noro Silk Garden Lite in blue/yellow color which I used for a hat. I wanted the shrug to be extra cozy and added Kidsilk Haze in Trance, a slightly darker blue. I just love the way colors in Noro yarn get blended with each other by the silk-mohair’s blue wash.
.JPG)
I used 4.5 mm needles and cast on 171 stitches as specified for the smaller size and knit the Top piece. For the bottom lace section, 4.5 mm needles produced a fabric which was stiff compared to the top section. So, I re-started with 5.5 mm needles and cast on 49 stitches instead of 64. The gauge for the lace pattern was 5 rows per inch. I knitted 290 rows for the bottom section. It is so lovely that I’ve been wearing it every night.
Next, a fellow knitsmith, Nancy, was knitting Manon from Norah Gaughan’s book No. 1, and I decided I want to knit one for my sister. I happened to have 12 balls of Peruvian Highland Wool in terra cotta, the color she loves. Now, my yarn is worsted weight while the pattern calls for Aran weight. This difference did not deter me, but I had to keep in mind that my sister is at least one inch taller and quite skinnier than I am. Especially, her shoulder width is much narrower. There is no way of fitting the garment while I knit as she lives in Azumino, Japan. If the garment fit me too tight, it would fit her just right.
Instead of planning changes like I did for Elizabeth I, I decided to plunge fearlessly this time. As I expected, things went wrong. I began knitting the peplum for size 34” with 4.5 mm needles. The finished peplum section was much larger than I intended. Also, I noticed that I prefer to have the ribbing section a bit narrower and sitting at waist level. Switching to 4 mm needles, I started from scratch and decided to skip two rows of ribbing over every 8 rows of cable pattern. It turned out almost exactly how I wanted it to be.
.JPG)
.JPG)
The rest of the bodice went smoothly and the only change I made was to lengthen the underarm side seams to 5 ½”. My sister does not wear trendy clothes. Those short sleeves won’t be easy for her to deal with. I knit slim and long sleeves with cuffs which are not sewn at sides. For the closures, I crocheted button loops with chain stitches. Extra buttons were attached at the top of the cuffs.
.JPG)
.JPG)
The finished cardigan fits me very snugly, too snug actually. My DD1 looks quite good in it, too. As I truly love the design, I started knitting one for myself in green.
.JPG)
Looks like it’s going to be much larger than my sister's. Thanks goodness!
I used 4.5 mm needles and cast on 171 stitches as specified for the smaller size and knit the Top piece. For the bottom lace section, 4.5 mm needles produced a fabric which was stiff compared to the top section. So, I re-started with 5.5 mm needles and cast on 49 stitches instead of 64. The gauge for the lace pattern was 5 rows per inch. I knitted 290 rows for the bottom section. It is so lovely that I’ve been wearing it every night.
Next, a fellow knitsmith, Nancy, was knitting Manon from Norah Gaughan’s book No. 1, and I decided I want to knit one for my sister. I happened to have 12 balls of Peruvian Highland Wool in terra cotta, the color she loves. Now, my yarn is worsted weight while the pattern calls for Aran weight. This difference did not deter me, but I had to keep in mind that my sister is at least one inch taller and quite skinnier than I am. Especially, her shoulder width is much narrower. There is no way of fitting the garment while I knit as she lives in Azumino, Japan. If the garment fit me too tight, it would fit her just right.
Instead of planning changes like I did for Elizabeth I, I decided to plunge fearlessly this time. As I expected, things went wrong. I began knitting the peplum for size 34” with 4.5 mm needles. The finished peplum section was much larger than I intended. Also, I noticed that I prefer to have the ribbing section a bit narrower and sitting at waist level. Switching to 4 mm needles, I started from scratch and decided to skip two rows of ribbing over every 8 rows of cable pattern. It turned out almost exactly how I wanted it to be.
The rest of the bodice went smoothly and the only change I made was to lengthen the underarm side seams to 5 ½”. My sister does not wear trendy clothes. Those short sleeves won’t be easy for her to deal with. I knit slim and long sleeves with cuffs which are not sewn at sides. For the closures, I crocheted button loops with chain stitches. Extra buttons were attached at the top of the cuffs.
The finished cardigan fits me very snugly, too snug actually. My DD1 looks quite good in it, too. As I truly love the design, I started knitting one for myself in green.
Looks like it’s going to be much larger than my sister's. Thanks goodness!
Subscribe to:
Posts (Atom)